Flash a New Image Using Toradex Easy Installer
Introduction
This article provides a guide on flashing a new OS image (custom build or pre-built image) using the Toradex Easy Installer tool. If you need to customize the Toradex Easy Installer image, see How to Modify a Toradex Easy Installer Image, Toradex Easy Installer Configuration Files and How to Customize Toradex Easy Installer Boot.
Why flash a new OS image using Tezi?
As mentioned in the Toradex Easy Installer Overview, Tezi is the recommended way to flash your image onto Toradex SoMs. You might face one of these cases:
- Factory default status: Toradex Easy Installer is flashed in the factory as the default image. You will be able to see the tool's GUI on your screen after booting the module for the first time and installing the pre-built image of your choice.
- The SoM already has an Operating System flashed: If your module already has an Operating System and you want to install another OS, custom build or not, you can download Tezi image and load it into the module's RAM through a host computer over USB OTG (see the Load Toradex Easy Installer article).
In any of those cases, using Tezi is the most straightforward way to do it.
Requirements
- A Toradex System on Module with Toradex Easy Installer installed.
- (optional) If Tezi is not installed in your module, you need to manually load it. For this, refer to the Loading Toradex Easy Installer article.
- (optional) Toradex provides pre-built, ready-to-use images in our online feeds. Some of them are meant for evaluation, as our Partner Demo Images and our Reference Images for Yocto Project, others for production, as Torizon OS.
Flash a Toradex Pre-built Image
Display the GUI
To access the Tezi interface, you must:
-
Use a Display as output: Once the Toradex Easy Installer is loaded into RAM, you should see a User Interface appearing on the DVI-I/HDMI, VGA, or on the parallel RGB (Unified Interface Display) ports of your carrier board (obviously a display must be connected at that port). The default outputs are:
- DVI-I/HDMI port on Apalis
- RGB with VGA resolution on Colibri
- HDMI through the Verdin DSI to HDMI Adapter on Verdin. (HDMI hotplug is not supported. You must connect the HDMI cable with the board powered off and only then power it on).
-
Use a remote desktop as output: If you can't use any of these display options, you can access the user interface remotely over the network using VNC. For this, you should connect a USB cable to the USB / OTG port of your carrier board. The module provides a connection via USB RNDIS with the default IP address of
192.168.11.1.tipThe USB / OTG port we refer to is the same one used to enter recovery mode. Refer to the article iMX Recovery Mode to find the correct port for your carrier board.
Alternatively, you can use the IP address of the ethernet interface, which will depend on the DHCP server serving your LAN.
Use your preferred VNC client to connect to this address. For example:
$ vncviewer 192.168.11.1For Windows 10, we recommend using TightVNC. For Linux, we recommend Vinagre.
Provide OS Images
To provide the OS images to Tezi, you have two options:
-
Online installation (preferred): this is the easiest method. To list images from the Internet, make sure that you connect the board via Ethernet to a network that provides Internet access (the installer relies on DHCP to configure the IP address and HTTP to download images). After some seconds you should see a list of images appearing.
-
Offline installation: Alternatively, if you cannot connect the board directly to the internet, you can use an external media with a pre-built image or a custom image. Once you plug it into the board, the images should appear in the list of available images with an icon indicating that it is found on a local storage device.
- Pre-built images: Download Toradex OS and partner demo images from our website and unzip/untar it onto an SD Card or USB Flash Drive. For all available images, visit Toradex Download Links (Torizon, Linux BSP, WinCE and Partner Demos).
- Custom image: Use Yocto Project/OpenEmbedded to build a custom image in a Tezi-suitable format and transfer it to an external media (SD Card or USB stick).
Please insert the SD card in X19 (SD/MMC 4 bit) if you are using Apalis TK1 with Apalis Evaluation Board.
Install OS Images
Preparation for Offline installation
- Prepare your external media (a USB stick or SD card): its filesystem must be formatted as FAT32 or ext4.
- Download the desired image from Toradex Download Links (Torizon, Linux BSP, WinCE and Partner Demos). The download will be a
.tarfile. - Extract the
.tarfile to your external media (a USB stick or SD card). The extraction will result in a folder with the name as the image. - Your external media is ready to be recognized by Toradex Easy Installer running on your module.
Remarks:
- You can have more than one image extracted in your external media, as long as each image is in its own folder.
- You can keep files unrelated to Toradex Easy Installer in your external media. They won't be modified.

To install an image:
- Use a USB mouse or USB keyboard to select the desired image.
- Click on the "Install (i)" button or press "i" to start the installation.
- Follow the instructions until installation begins.
After the image has been successfully installed you should see the following message on your screen:

At this point, all data have been stored on internal flash and caches have been flushed (synced). It is not required to click on any of these three buttons, it is perfectly fine to just reset or turn off the system.
Enable the Toradex CI Feed and Add Your Own Feeds
If you want to add more sources to Toradex Easy Installer (such as adding your own server to it), use the Feeds button.
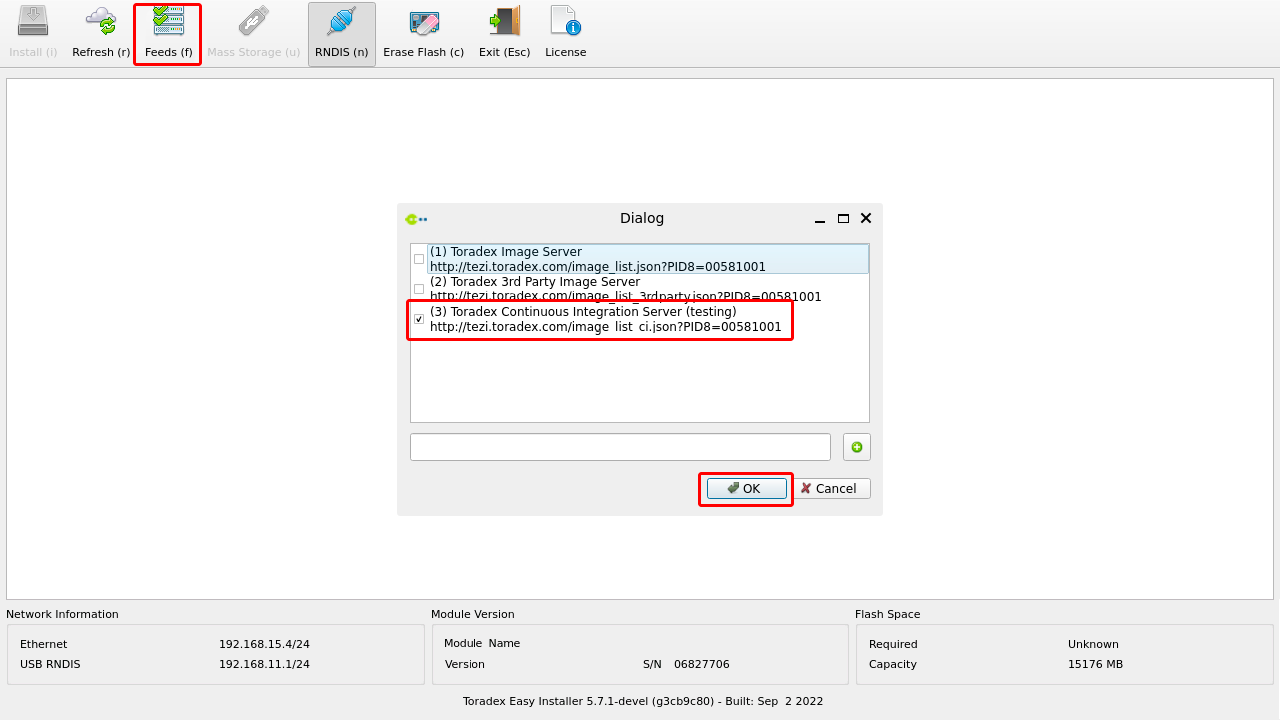
A simple test can be done by allowing the Toradex Continuous Integration Server (testing) option.