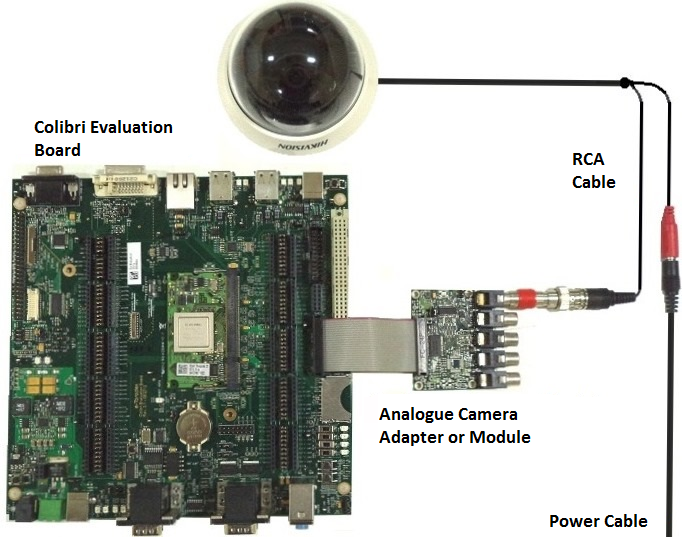
This article describes the step-by-step procedure to interface and test the Analogue Camera Adapter (ACA)/Analogue Camera module (ACM) with the Apalis and Colibri evaluation boards or the Ixora carrier board using the parallel camera interface.
Attention: the Analogue Camera module (ACM) reached end-of-life (EOL) and is not available for purchase anymore.
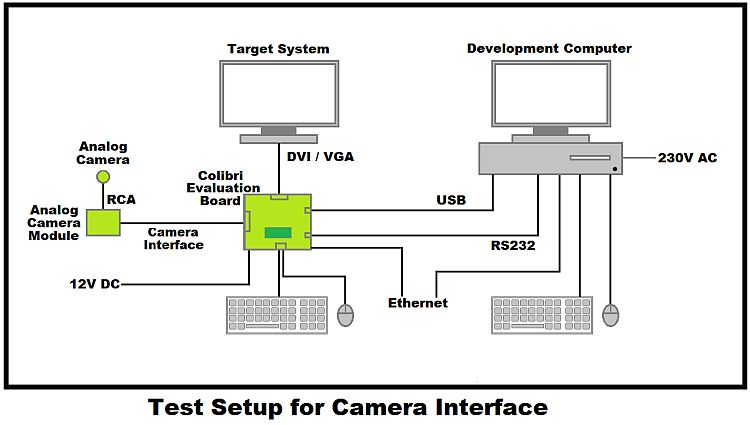
The following block diagram shows the set up required for the test.
Note:
On the Colibri Evaluation Board V3.2 the pinout of the parallel camera interface connector X22 has been update to maintain compatibility with the Apalis Evaluation Board.
Thus a custom cable will be required to connect the ACM V1.1 with the Colibri Evaluation Board V3.2.
For more details, please refer to the Analogue Camera Module Datasheet, section 6.
The Analogue Camera Adapter (ACA) pinout is compatible with the parallel camera interfaces on the Apalis Evaluation Board and the Colibri Evaluation Board v3.2.
The necessary drivers are provided as kernel modules.
On Apalis iMX6 the default device tree contains the needed configuration.
On a Colibri iMX6 the device tree imx6dl-colibri-cam-eval-v3.dtb must be loaded in U-Boot to set the non standard pin muxing and configuration needed as follows:
Colibri iMX6 # setenv fdt_file imx6dl-colibri-cam-eval-v3.dtb
Colibri iMX6 # saveenv
If you use the ADV7280 the input channel is fixed set to AIN1 on the ACM's connector X2. If you use the ADV7180 the input channel is fixed set to A_IN2_3 on the ACM's connector X5. If you use the MAX9526 the input channel is determined by the Auto-Select feature of the chip.
During boot both VDACs are probed. The kernel output looks as follows if a MAX9526 gets detected:
root@apalis-imx6:~# dmesg | grep adv
[    7.190161] adv7280 1-0021: chip found @ 0x42 (21a8000.i2c)
[    7.206648] adv7280 1-0021: no sensor pwdn pin available
[    7.363966] mxc_v4l2_master_attach: ipu0:/csi0 parallel attached adv7280:mxc_v4l2_cap0
root@colibri-imx6:~# dmesg | grep adv
[    7.772107] adv7180 2-0021: Error applying setting, reverse things back
[    7.877802] adv7180 2-0021: Error applying setting, reverse things back
[    7.887786] adv7180 2-0021: setup pinctrl failed
[    7.894598] adv7180: probe of 2-0021 failed with error -22
root@colibri-imx6:~# dmesg | grep max9526
[    7.538711] max9526 2-0020: cannot get analog voltage
[    7.620635] mxc_v4l2_master_attach: ipu0:/csi1 parallel attached max9526:mxc_v4l2_cap0
Note: If you get a not detected -6 error upon driver probing you may need to manually reset the Analogue Camera Adapter and re-boot!
Independently of which VADC you use, the following gstreamer pipeline displays the camera input on screen.
root@apalis-imx6:~# gst-launch-1.0 imxv4l2videosrc device=/dev/video0 ! imxipuvideosink use-vsync=true
Setting pipeline to PAUSED ...
[  103.985952] mxc_sdc_fb fb@0: 1920x1080 h_sync,r,l: 44,88,148  v_sync,l,u: 5,4,36 pixclock=148500000 Hz
Pipeline is live and does not need PREROLL ...
Setting pipeline to PLAYING ...
New clock: GstSystemClock
[  104.577264] imx-ipuv3 2400000.ipu: IDMAC21's EBA0 is not 8-byte aligned
...
^Chandling interrupt.
Interrupt: Stopping pipeline ...
Execution ended after 0:00:00.493605607
Setting pipeline to PAUSED ...
Setting pipeline to READY ...
Setting pipeline to NULL ...
[  104.999476] mxc_sdc_fb fb@0: 1920x1080 h_sync,r,l: 44,88,148  v_sync,l,u: 5,4,36 pixclock=148500000 Hz
Freeing pipeline ...
Since V2.5 Beta 2:
root@apalis_imx6:~# gst-launch tvsrc ! imxv4l2sink
Since V2.4 Beta 1:
root@colibri-imx6:~# gst-launch tvsrc ! mfw_v4lsink
Note: Support for the Analogue Camera Adapter (ACA) was introduced in our Embedded Linux BSP V2.6 Beta 2 demo images.
For Apalis T30 the kernel modules are included out of the box with the modular camera configuration enabled, which allows switching not only decoders but also their inputs at run time.
The correct order to load modules:
modprobe videobuf2-memops
modprobe videobuf2-dma-nvmap
modprobe max9526
# or modprobe adv7180
# or modprobe adv7280
modprobe tegra_v4l2_camera
To change the decoder on the fly:
rmmod tegra_v4l2_camera
rmmod max9526
# or rmmod adv7180
modprobe adv7180
# or modprobe adv7280
# or modprobe max9526
modprobe tegra_v4l2_camera
gst-launch v4l2src ! deinterlace tff=1 method=4 ! nv_omx_videomixer ! nv_gl_eglimagesink
Note:
If using the Analogue Camera Adapter (ACA) there is no need to use the software de-interlacing as the ADV7280 has a hardware de-interlacing feature.
Support for the Analogue Camera Module (ACM) was introduced in our Embedded Linux BSP V2.5 Beta 3 demo images.
Device Drivers --->

 <*> Multimedia support (CONFIG_MEDIA_SUPPORT) --->

  [*] Video capture adapters (CONFIG_VIDEO_CAPTURE_DRIVERS) --->

   Encoders, decoders, sensors and other helper chips  --->

    <M> Analog Devices ADV7180 decoder (CONFIG_VIDEO_ADV7180)
    <M> Analog Devices ADV7280 decoder (CONFIG_VIDEO_ADV7280)

   <*> SoC camera support (CONFIG_SOC_CAMERA)
   <M> max9526 support (CONFIG_SOC_CAMERA_MAX9526)
   <M> Tegra soc_camera host driver (CONFIG_VIDEO_TEGRA)
sudo -E make INSTALL_MOD_PATH=/<path>/<to>/<your>/rootfs modules_install
modprobe videobuf2-memops
modprobe videobuf2-dma-nvmap
modprobe max9526
# or modprobe adv7180
# or modprobe adv7280
modprobe tegra_v4l2_camera
rmmod tegra_v4l2_camera
rmmod max9526
# or rmmod adv7180
modprobe adv7180
# or modprobe adv7280
# or modprobe max9526
modprobe tegra_v4l2_camera
gst-launch v4l2src ! deinterlace tff=1 method=4 ! nv_omx_videomixer ! nv_gl_eglimagesink
Note:
If using the Analogue Camera Adapter (ACA) there is no need to use the software de-interlacing as the ADV7280 has a hardware de-interlacing feature.
Support for the Analogue Camera Module (ACM) was introduced in our Embedded Linux BSP V2.5 Beta 3.
To switch inputs
v4l2-ctl -i 0
v4l2-ctl -i 1
v4l2-ctl -i 2
v4l2-ctl -i 3
v4l2-ctl -i 4
The kernel drivers for Apalis/Colibri iMX6 currently do no allow switching the VDACs channels.
Please note that when using MAX9526, v4l2-ctl -i can only be used to switch the MAX9526 video decoder input channel but not the MAX4586 video multiplexer which connects to video inputs 1 to 4. By default, the second input channel 2 is active, which connects to video input 5. Please refer the block diagram below.
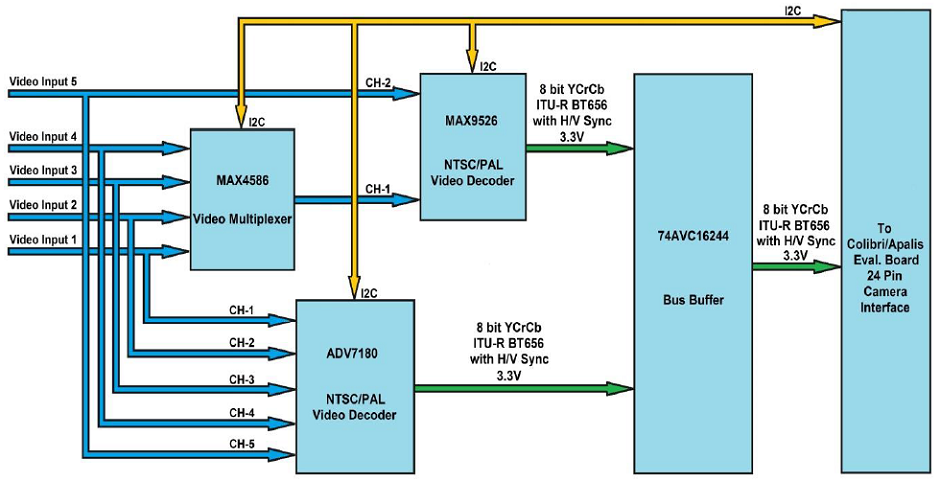
To change the MAX4586 channel a separate I2C user space application is required as below.
//${CROSS_COMPILE}gcc max4586.c -o max4586

#include <stdint.h>
#include <unistd.h>
#include <stdio.h>
#include <stdlib.h>
#include <fcntl.h>
#include <sys/ioctl.h>
#include <linux/types.h>
#include <linux/i2c-dev.h>

int main(int argc, char *argv[])
{
 char buf[8] = {0};
 char filename[20] ={0};
 int file;
 int adapter_nr = 0; /* probably dynamically determined */
 int addr = 0x37;  /* The I2C address */

 if (argc < 2) {
  printf("usage: %s [i2c-bus] [i2c-addr] [nox-bit]\n", argv[0]);
  printf("\twhere:\n");
  printf("\ti2c-bus: 0 for Colibri T20/T30, 2 for Apalis T30 or Colbri iMX6, 3 for Apalis iMX6\n");
  printf("\ti2c-addr: 0x35 if JP4 placed or 0x37 if JP4 left open\n");
  printf("\tnox-bit: 1 for NO1, 2 for NO2, 4 for NO3 or 8 for NO4\n");
  exit(1);
 } else if (argc == 2) {
  buf[0] = atoi(argv[1]);
 } else if (argc == 3) {
  adapter_nr = atoi(argv[1]);
  buf[0] = atoi(argv[2]);
 } else {
  adapter_nr = atoi(argv[1]);
  sscanf(argv[2], "0x%x", &addr);
  buf[0] = atoi(argv[3]);
 }

 //printf("i2c-bus = %d, i2c-addr = 0x%02x, nox-bit = %d\n", adapter_nr, addr, buf[0]);

 //open the device file
 snprintf(filename, 19, "/dev/i2c-%d", adapter_nr);
 file = open(filename, O_RDWR);
 if (file < 0) {
  /* ERROR HANDLING; you can check errno to see what went wrong */
  printf("ERROR HANDLING; you can check errno to see what went wrong\n");
  exit(1);
 }

 //specify device address to communicate
 if (ioctl(file, I2C_SLAVE, addr) < 0) {
  /* ERROR HANDLING; you can check errno to see what went wrong */
  printf("ERROR HANDLING; you can check errno to see what went wrong\n");
  exit(1);
 }

 /* Using I2C Write */
 if (write(file, buf, 1) != 1) {
  /* ERROR HANDLING: i2c transaction failed */
  printf("ERROR HANDLING: i2c transaction failed\n");
  exit(1);
 }

 exit(0);
}
NOTE: The Analogue Camera Adapter (ACA) is available on the Toradex Webshop.
