How to Use Web Browser (Linux)
Introduction
WPE WebKit (former WebKitForWayland), is the official webKit port for embedded platforms. It aims to allow embedded developers to create simple and performant systems based on Web platform technologies. It is designed with hardware acceleration in mind, leveraging common 3D graphics APIs for best performance.
For further information you can check:
Also, Chromium support is provided by the 3rd party layer meta-browser.
Torizon OS
If you are looking for information on how to use web browsers on Torizon OS, refer to Web Browser / Kiosk Mode with Torizon OS.
Requirements
Before proceeding with this article, make sure you have a good understanding of the process described at Build a Reference Image with Yocto Project/OpenEmbedded article.
Build Machine Requirements
Minimum specifications:
- 60GB of free disk space;
- 32 bits host machine;
- 4GB of RAM.
Recommended specifications:
- Multi-core machine;
- 64 bits host machine;
- 8GB or more of RAM.
The following Linux distributions are supported and you must use one of them on your development PC to build our BSPs: Detailed Supported Distros.
Build Dependencies
You must install the Yocto Project dependencies listed at required packages on the host PC.
First Steps
For more information on how to use Yocto Project in your project, you can refer to the following articles:
- Build a Reference Image with Yocto Project/OpenEmbedded
- Custom meta layers, recipes and images in Yocto Project (hello-world examples)
- Reference Images for Yocto Project Software Downloads
- BSP Layers and Reference Images for Yocto Project Software
For your first build, you can also refer to Yocto Project documentation.
Cog Browser
Add Cog/WPE using Yocto Project
The first step is to setup Yocto build environment, as described in Build a Reference Image with Yocto Project/OpenEmbedded.
Considering you already have set up the Yocto Project environment, the variable LAYERDIR contains the path to the layers directory, and the variable BUILDDIR, the path to the build directory.
Then go to the LAYERDIR and clone the Meta-Webkit repository. Make sure to checkout the Kirkstone branch, since BSP 6 is based on the Kirkstone Yocto branch.
$ cd ${LAYERDIR}

$ git clone -b kirkstone https://github.com/Igalia/meta-webkit.git
It's important to have, in the layers directory, the QT5 layer, which you can find in the Qt5 layers Github.
$ cd ${LAYERDIR}

$ git clone https://github.com/meta-qt5/meta-qt5.git
After these steps, you will have to add the layers into the bblayers.conf.
$ cd ${BUILD_DIR}
$ echo 'BBLAYERS += " ${TOPDIR}/../layers/meta-webkit"' >> conf/bblayers.conf
The next step is to change the local.conf file to add the correct package to the output image. So add the following lines at the end of the local.conf file.
CORE_IMAGE_EXTRA_INSTALL += "wpewebkit cog imx-gst1.0-plugin"
PREFERRED_PROVIDER_virtual/wpebackend = "wpebackend-fdo"
Don't forget to select the specific machine to target the build with also in the local.conf.
Then, you can build the multimedia reference image:
$ bitbake tdx-reference-multimedia-image
Running Cog
In order to test cog, stop the main reference app:
# systemctl stop wayland-app-launch
In order to start Cog with the correct backend plugin, you need to execute:
# cog --platform=fdo www.toradex.com
The following variables may be interesting for a better experience with the web browser:
# for full screen window, it worked but I could not see the mouse pointer
# and because there's no window decoration I could also not kill it anymore
export COG_PLATFORM_FDO_VIEW_FULLSCREEN=1

# for setting the window size
export COG_PLATFORM_FDO_VIEW_WIDTH=1920
export COG_PLATFORM_FDO_VIEW_HEIGHT=1080
Chromium Browser
Add Chromium using Yocto Project
To use chromium, you have to be aware of the specific requirements for the commercial license of libav and x264 packages.
As was done in the previous section, the first step is setting up Yocto build environment, as described in Build a Reference Image with Yocto Project/OpenEmbedded.
Then, to add Chromium to the build, clone the meta-browser repository.
$ cd ${LAYERDIR}

$ git clone -b master https://github.com/OSSystems/meta-browser.git
As you are able to verify, the meta-browser layer has two other layers inside: meta-chromium and meta-firefox. In this section, just meta-chromium layer is going to be used.
$ cd meta-browser
$ tree -L 2
.
├── COPYING.MIT
├── meta-chromium
│   ├── conf
│   ├── README.md
│   └── recipes-browser
└── meta-firefox
    ├── classes
    ├── conf
    ├── README.md
    ├── recipes-browser
    ├── recipes-devtools
    └── scripts
The last known version that works with GPU acceleration in i.MX modules is Chromium v101. Any newer versions may not support GPU hardware acceleration. However, if you require GPU acceleration:
Checkout to a specific
meta-browsercommit to obtain Chromium v101.$ cd meta-browser
$ git checkout e232c2e
Next, following the GPU accelerated mode, you need to apply patches from NXP meta-imx layer. Follow the next steps to compile Chromium v101 with GPU enabled:
Clone the
meta-imxto a know location, like${LAYERDIR}as an example:$ cd ${LAYERDIR}
$ git clone -b langdale-6.1.1-1.0.0 https://github.com/nxp-imx/meta-imx/Go back to the build directory, create a new layer and copy the necessary patches.
$ cd ../build
$ bitbake-layers create-layer ../layers/meta-toradex-chromium
$ bitbake-layers add-layer ../layers/meta-toradex-chromium
$ rm -rf ../layers/meta-toradex-chromium/recipes-example
$ cp -r ../layers/meta-imx/meta-sdk/dynamic-layers/chromium-browser-layer/recipes-browser ../layers/meta-toradex-chromium
The final
meta-toradex-chromiumfolder structure will be:.
├── conf
│ └── layer.conf
├── COPYING.MIT
├── README
└── recipes-browser
└── chromium
├── chromium-ozone-wayland
│ ├── 0001-Fixed-chromium-flicker-with-g2d-renderer.patch
│ ├── 0002-chromium-met-EGL-API-GetProcAddress-failures.patch
│ ├── 0003-Disable-dri-for-imx-gpu.patch
│ ├── 0101-V4L2VDA-Switch-to-use-VDA-instead-of-direct-VideoDec.patch
│ ├── 0102-GenericV4L2Device-Correct-v4l2-decoder-device-path.patch
│ ├── 0103-V4L2VDA-Add-macro-use_linux_v4l2.patch
│ ├── 0104-V4L2VDA-Create-single-multi-plane-queues.patch
│ ├── 0105-V4L2Buffer-Allocate-correct-v4l2-buffers-for-queues.patch
│ ├── 0106-V4L2VDA-Create-videoframe-according-to-v4l2buffer.patch
│ ├── 0107-V4L2VDA-Add-function-IsMultiQueue-for-S_FMT-and-G_FM.patch
│ ├── 0108-V4L2VDA-Use-correct-size-to-allocate-CAPTURE-buffer.patch
│ ├── 0109-V4L2VDA-Use-correct-plane-size-and-bytesused.patch
│ ├── 0110-V4L2VDA-Add-hevc-format-support.patch
│ ├── 0111-V4L2VDA-fix-vp9-crash-caused-by-DequeueResolutionCha.patch
│ ├── 0112-V4L2VDA-Add-fps-in-SkiaOutputSurfaceImplOnGpu-by-VLO.patch
│ ├── 0113-V4L2VDA-Comment-some-unused-ioctl.patch
│ ├── 0114-V4L2VDA-Set-OUTPUT-format-with-parsed-resolution-for.patch
│ ├── 0115-V4L2VDA-Add-V4L2_PIX_FMT_NV12M_8L128-format-for-amph.patch
│ ├── 0116-V4L2VDA-Support-tile-to-linear-transform-for-amphion.patch
│ ├── 0117-V4L2VDA-Enlarge-input-buffer-count-to-16.patch
│ ├── 0118-V4L2VDA-Use-dlopen-to-dynamically-use-g2d-api.patch
│ └── 0119-V4L2VDA-dlopen-libg2d.so.2-to-avoid-segfault.patch
└── chromium-ozone-wayland_%.bbappend
Now, proceed with the next steps even if GPU acceleration is not required.
Chromium packages use the Clang compiler. So, you need to have
meta-clanglayer cloned inside themeta-openembeddedlayers directory. Make sure to clone the Kirkstone branch of themeta-clanglayer.$ cd ${LAYERDIR}/meta-openembedded/
$ git clone -b kirkstone https://github.com/kraj/meta-clang.git
$ cd meta-clang/
$ tree -L 1
.
├── classes
├── CODE_OF_CONDUCT.md
├── conf
├── _config.yml
├── CONTRIBUTING.md
├── COPYING.MIT
├── dynamic-layers
├── README.md
├── recipes-bsp
├── recipes-connectivity
├── recipes-core
├── recipes-devtools
├── recipes-extended
├── recipes-graphics
├── recipes-kernel
└── recipes-multimediaTo read more about Clang, refer to Why and How to Use Clang Compiler with Yocto Project.
Add the chromium and clang layers to
bblayers.conf$ cd ${BUILD_DIR}
$ echo 'BBLAYERS += " ${TOPDIR}/../layers/meta-browser/meta-chromium"' >> conf/bblayers.conf
$ echo 'BBLAYERS += " ${TOPDIR}/../layers/meta-openembedded/meta-clang"' >> conf/bblayers.confGo to
conf/local.confand proceed with the following modifications:conf/local.confCORE_IMAGE_EXTRA_INSTALL += "chromium-<suffix>"
LICENSE_FLAGS_ACCEPTED += "commercial_libav commercial_x264"Since Yocto Thud, chromium is available for both x11 and wayland backend. So, the suffix may be
x11orozone-wayland.conf/local.conf# Backend Selection
#
# Select the backend option (x11 or ozone-wayland) from the lines below:
#
# CORE_IMAGE_EXTRA_INSTALL += "chromium-x11"
CORE_IMAGE_EXTRA_INSTALL += "chromium-ozone-wayland"Any more modifications that might have to be done, you can find at Why and How to Use Clang Compiler with Yocto Project.
Run the
bitbakecommand.$ bitbake tdx-reference-multimedia-image
Running Chromium
In order to test Chromium, stop the main reference app:
# systemctl stop wayland-app-launch
To start Chromium with the correct backend plugin, you need to execute:
# chromium --no-sandbox --ozone-platform=wayland www.toradex.com
The flags, keys and variables listed at Chromium Command Line Switches should help to provide a better use of Chromium web browser.
GPU Accelerated Chromium
Hardware acceleration increases performance of the web browser, allowing the browser to move graphics and text rendering from the CPU to the GPU. To enable GPU acceleration on chromium you must use the switch --in-process-gpu, like the following example:
# chromium --no-sandbox --in-process-gpu
To check the Graphics Feature Status, go to chrome://gpu on your browser. You should see a list simillar to the one in the following image.
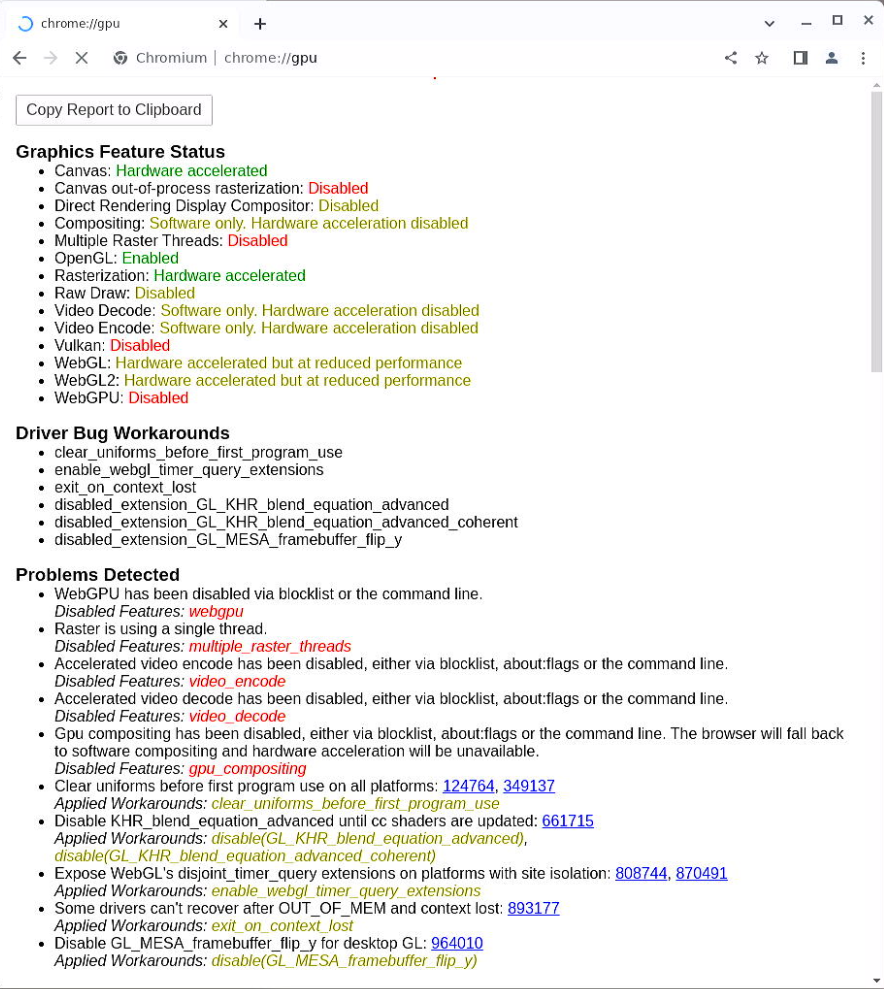
Be aware that the list you might see in your chromium may be slightly different, deppending on your SoM, BSP and browser versions.