Embedded Linux Application Development Overview
Introduction
This article guides you to set up an environment for Embedded Linux application development on Toradex System on Modules (SoMs). Typically, in deployment phase, you will build your application into the OS Image, before flashing it to the target device. However, for a faster development cycle, an alternative is to cross-compile the application in the host machine, copy the artifacts to the target and test them, without building a new image. This allows for a quick develop-deploy-debug cycle, making the development phase much faster.
At the end of this article, you will understand the general steps for developping an application for Toradex SOMs/COMs using a typical linux host desktop, and have a clear reference to follow for your particular project. The development process generally follows the sequence shown below:
- Configure your Host Machine for developping Embedded linux applications
- Run an Embedded Linux Image on your SoM
- Set up a cross-compilation environment for your application
- Develop, compile and deploy your application
Glossary
Some important terms when working with Embedded linux application development are the following:
- Target device: The device where the application will be deployed and ran.
- Host device: The device where the application will be developed, and which controls the target device.
- Cross Compilation Toolchain: A collection of compilation tools (compiler, preprocessor, linker, debugger, etc) used in the host device to compile an application to the target device.
- Target Root File System: A directory tree that represents the root (/) filesystem of the target device. The necessary runtime libraries, configuration files and additional binaries must be placed in this directory and copied to the target device at the moment of deployment.
- SDK (Software Development Kit): A collection of tools to develop the application: the cross-compilation toolchain, libraries, documentation, examples, etc.
- OS Image: A file containing the information necessary to load a specific kernel version, bootloader, modules, configuration, etc.
- Yocto Project: An open-source project to build and customize linux images. For more information on the Yocto Project, refer to the Yocto Project Website.
- Toradex BSP (Board Support Package): A Yocto layer containing all the configurations to generate a linux image compatible with Toradex SoMs.
Prerequisites
- Understand the basic concepts of Toradex Embedded Linux offerings, such as release cycles, distributions and images. Refer to BSP Layers and Reference Images for Yocto Project Software.
- A host machine and operating system suitable for development with Yocto.
Development Setup
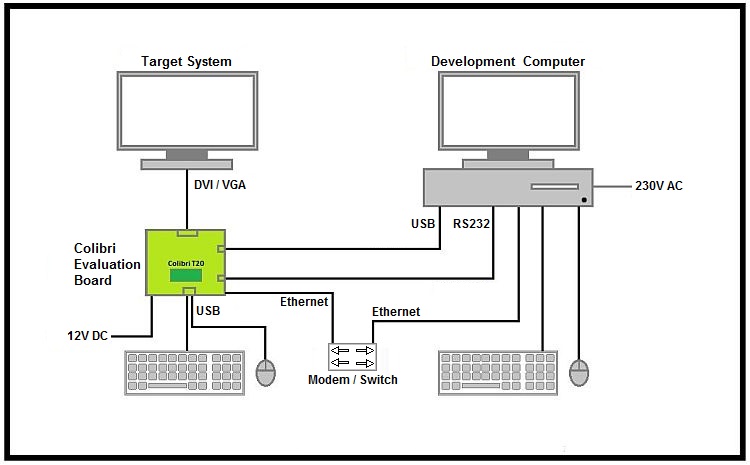
The following block diagram illustrates the hardware setup suitable for development.
Host Machine Configuration
Embedded Linux application development on Toradex Devices heavily relies on our BSP, mainly for building the SDK for your image.
Follow the steps described in Host Machine Setup for Building with Yocto.
Run a Linux Image on Your Device
Using our BSP Layers and Reference Image is the fastest way to have a Linux image compatible with Toradex Devices. To get a compatible Linux image running in a Toradex Device, follow the steps below:
-
Obtain a compatible image: To obtain a linux image for your module, you can:
- Download one of our pre-built reference images.
- Alternatively, you can build an image with our BSP Layer using the Yocto Project.
-
Flash your Image: Use Toradex Easy Installer to deploy your Image to Toradex SoMs. Keep in mind a few important differences in this approach from standard Embedded Linux development:
- Toradex Easy Installer flashes the OS Image directly into the eMMC memory of the module, instead of an external storage device.
- Toradex Easy Installer can only flash a Tezi-compatible image into the module. Other commonly used image formats, such as
.wic, will not be detected by Toradex Easy Installer. If you wish to flash a.wicimage to your device, refer to this guide.
Refer to these articles for alternative methods of flashing your image.
-
Connect to the target device: Make sure you have can access a terminal from your device. The most common approaches are:
- Connect to the device's serial interface. You will also need a serial terminal emulator on your host machine.
- Connect to the device via ssh, if the board is connected to the same network as your host machine
Set Up the Cross-Compilation SDK
To obtain the cross-compilation toolchain for your image, Build the SDK with Yocto. Additionally, set up your IDE to work with the custom SDK.
The Root File System
For most complex applications, it will not be enough to deploy the compiled application binary, since most projects depend on runtime libraries, configuration files, binaries, and expect a specific locations for these files depending on the system architecture.
Because of that, it is important to build your cross-compiled application alongside a directory that mirrors the file architecture structure of the target device. This directory is called the Root File System.
When cross-compiling an application with the Yocto-generated SDK, you don't need to manage the Root File System yourself, since the SDK has its own copy of Root File System generated for your image with Yocto. When compiling an application through the SDK, it will automatically link your binaries to the Root File System through the --sysroot compiler flag. Further details on managing runtime dependencies are explained in the workflow section.
After sourcing the environment setup script for your SDK, you can see the location of the Root File System by running the command:
echo "$SDKTARGETSYSROOT"
Application Development Workflow
A general workflow can be summarized as the following:
- Write the application code: The SDK integration into your IDE is especially important for this step to improve the development experience.
- Compile the application using the cross-compilation SDK: The compilation process depends on several factors, such as the programming languages and libraries to be used in the project. Please refer to the specific instructions for your programming language of choice.
- Deploy the artifacts to the target machine: Copy the build output to the board, using tools such as
scporrsync. If you only have a serial connection to your board, you can also userzandsxto transfer the binaries. - Run the application on the target machine: Connect to your target device such as instructed in Run a Linux Image on Your SoM and run your application binary.
The steps above cover the development of basic applications, keep in mind that the development process workflow depends highly on the particularities of your project. Be aware of the following points:
- Runtime dependencies: If your application has external dependencies, you will need to cross-compile and deploy them along with your application or rebuild your image with the dependencies installed. To add the dependencies to your Yocto built image refer to Custom meta layers, recipes and images in Yocto Project (hello-world examples). After rebuilding your image, also rebuild the SDK so that the Root File System includes the dependencies, and so that the SDK links them correctly to your application binaries.
- Peripherals: If your application makes usage of hardware peripherals, you will need to properly configure and interface with them. Refer to the Peripheral Access documentation for your specific use-case.
- Application Specific Configuration: The development process and configurations also differ highly depending on type of project you are building. Refer to the specific articles for your application's domain(s):
- Network Connectivity
- GUI Applications
- Multimedia Applications (Video and/or Audio I/O)
- Machine Learning
Write a Basic Application
Write a basic Hello World application in C to get started with Embedded Linux application development.