Configuring Serial Port Debug Console (Linux/U-Boot)
Introduction
On our Toradex modules, the U-Boot boot loader and the Linux kernel use UART_A as serial debug console. The serial console is the primary and most reliable interface to the boot loader and Linux kernel. This article has two main sections:
- How to use (attach to and communicate via) the debug UART, a.k.a serial console.
- How to disable the debug UART.
If you are looking for instructions on how to communicate with other devices using the UART, please refer to the article UART (Linux).
We do not recommend to use UART_A for any other purpose. Disabling it prevents analyzing errors (e.g. crash of the user interface) or analyzing if the system is in a non-bootable state.
This article shows how to disable the debug messages on the serial console only. In case you would like to disable debug messages or the virtual console on graphical output (DVI-I, HDMI, LVDS, or VGA) please refer to the Framebuffer (Linux) article.
Use the Debug UART (Serial Console)
You can easily access your Toradex SoM via the serial, in this section, you will find out how to set up the hardware on each of our boards as well as know the parameters. This section applies to both our BSP Layers and Reference Images for Yocto Project and Torizon OS.
Console Serial Parameters
Connecting to the board requires some parameters, here they are:
- port: it depends on your hardware, often it is
/dev/ttyUSBxon Linux, orCOMxon Windows, beingxa number to be determined in the next section. - Baud Rate:
115200 - Parity:
none - Bits:
8 - Stop bits:
1 - Flow control:
none
Windows - Find the Number of the COM Port
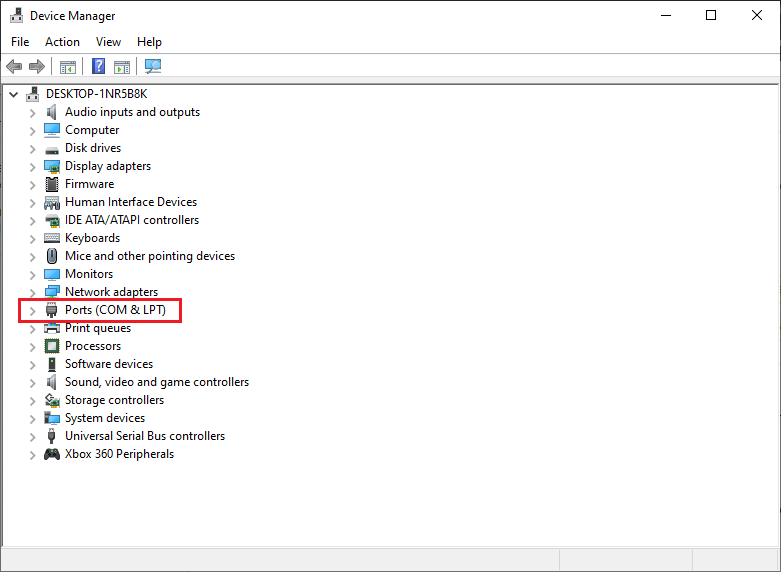
Go to Control Panel and find the Device Manager. Your COMx port will be listed under Ports.
Linux - Find the Number of the ttyUSB Port
Unplug the device from your computer and run:
$ ls /dev/ttyUSB*
Plug the device and run the same command again, your device will be listed:
$ ls /dev/ttyUSB*
Linux - Add User to Dialout Group
To avoid being requested to use sudo all the time, you can add your user to the dialout group. You can find your user name with the whoami command. To do it in a single-line, in your development PC, run:
$ sudo usermod -a -G dialout $(whoami)
To apply the changes, either reboot or log off, and log in.
Hardware
Select your carrier board from the tabs below:
- Aquila Evaluation Board
- Clover Carrier Board
- Verdin Development Board
- Dahlia Carrier Board
- Mallow Carrier Board
- Yavia
- SMARC Development Board
- Apalis Evaluation Board
- Ixora Carrier Board
- Colibri Evaluation Board
- Aster Carrier Board
- Iris Carrier Board

The Clover Carrier Board features two debug UARTs (UART3 and UART4 interfaces). However, the debugging UART headers (J21 for 1.8V signals, and J2 for 3.3V signals) are not assembled by default. Refer to the Clover Datasheet for more information.

Mallow Carrier Board features two debug UARTs (UART3 and UART4). However, the Debugging UART Header (X11) is not assembled by default. Refer to the Mallow Datasheet for more information.
Connect a USB C to USB Type-A cable to DEBUG.
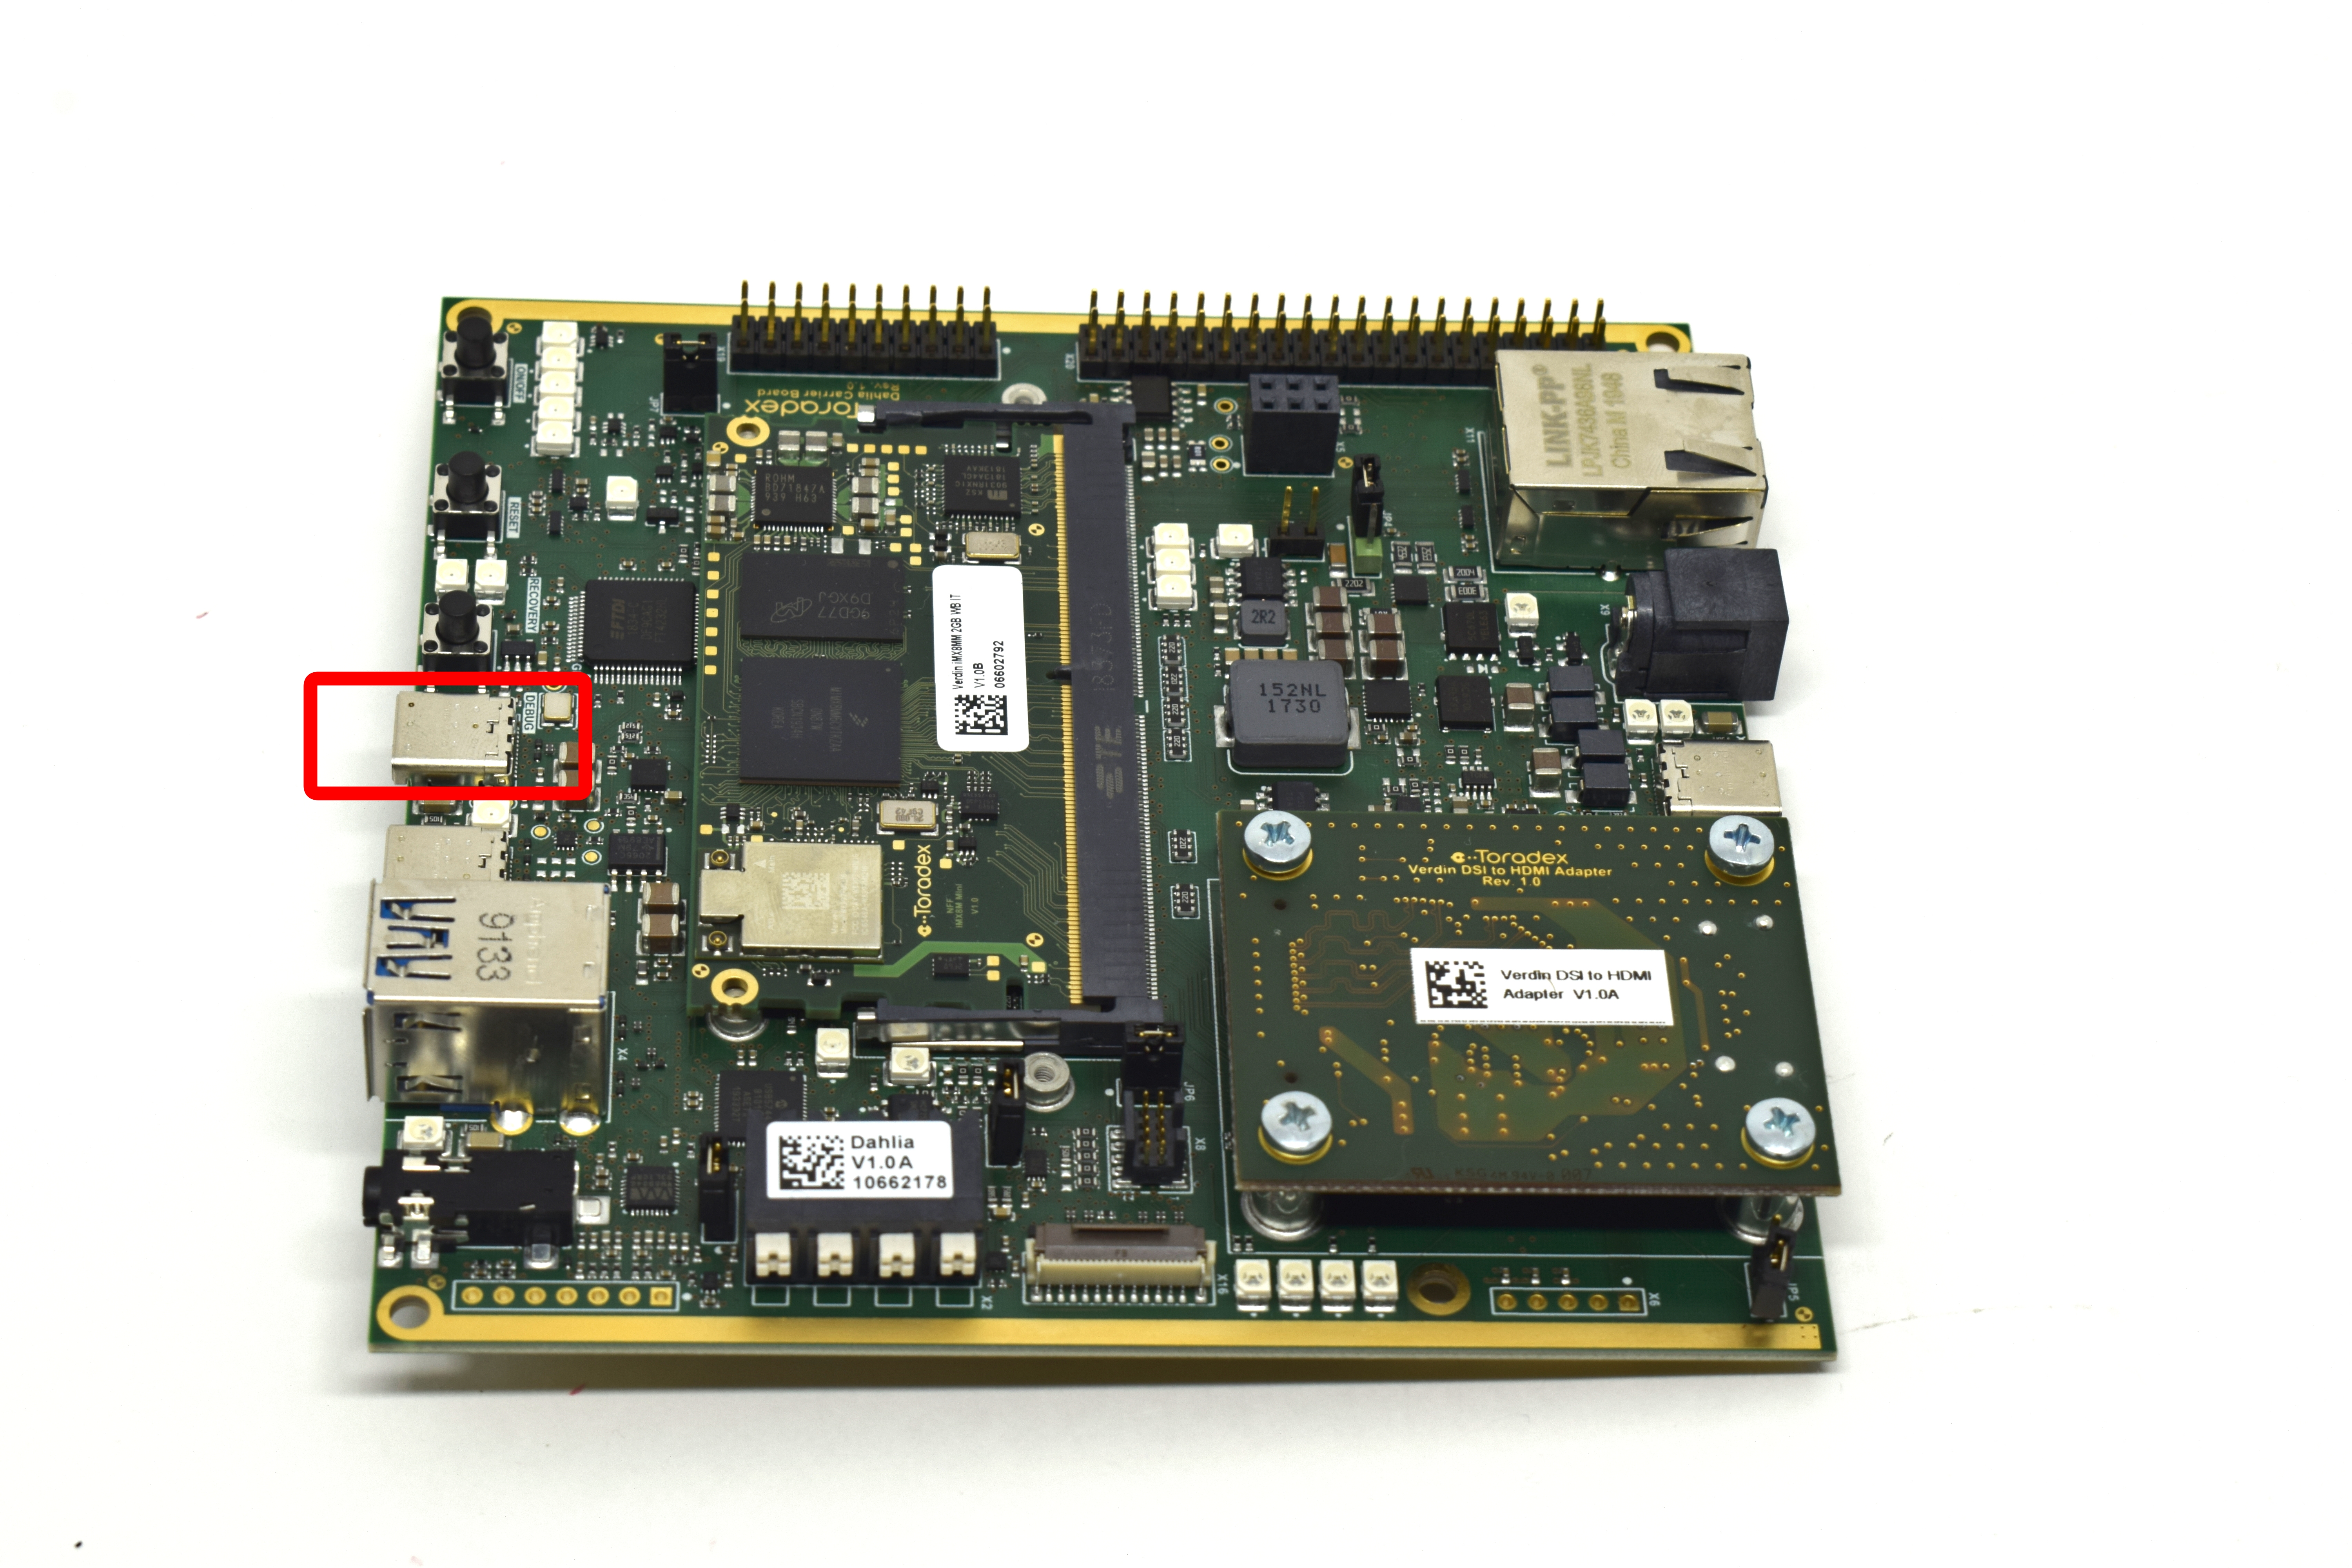
Notice that the USB C connector (DEBUG) has an integrated USB-serial converter that provides access to the computer on module's debug serial port.
Verdin has an integrated Serial-to-USB converter that lists 4 serial ports on your computer. The highest index is the Linux serial console. Example, if you see /dev/ttyUSB0, /dev/ttyUSB1, /dev/ttyUSB2 and /dev/ttyUSB3 listed, then /dev/ttyUSB3 is the serial console. The same logic applies to Windows COM ports.
If you connect to the first or the second port (for example /dev/ttyUSB0 or /dev/ttyUSB1), you will not be able to use the board. This happens because those ports are dedicated to power/reset control and FTDI JTAG. Just close those connections and reset the board.
Connect a USB C to USB Type-A cable to X66.
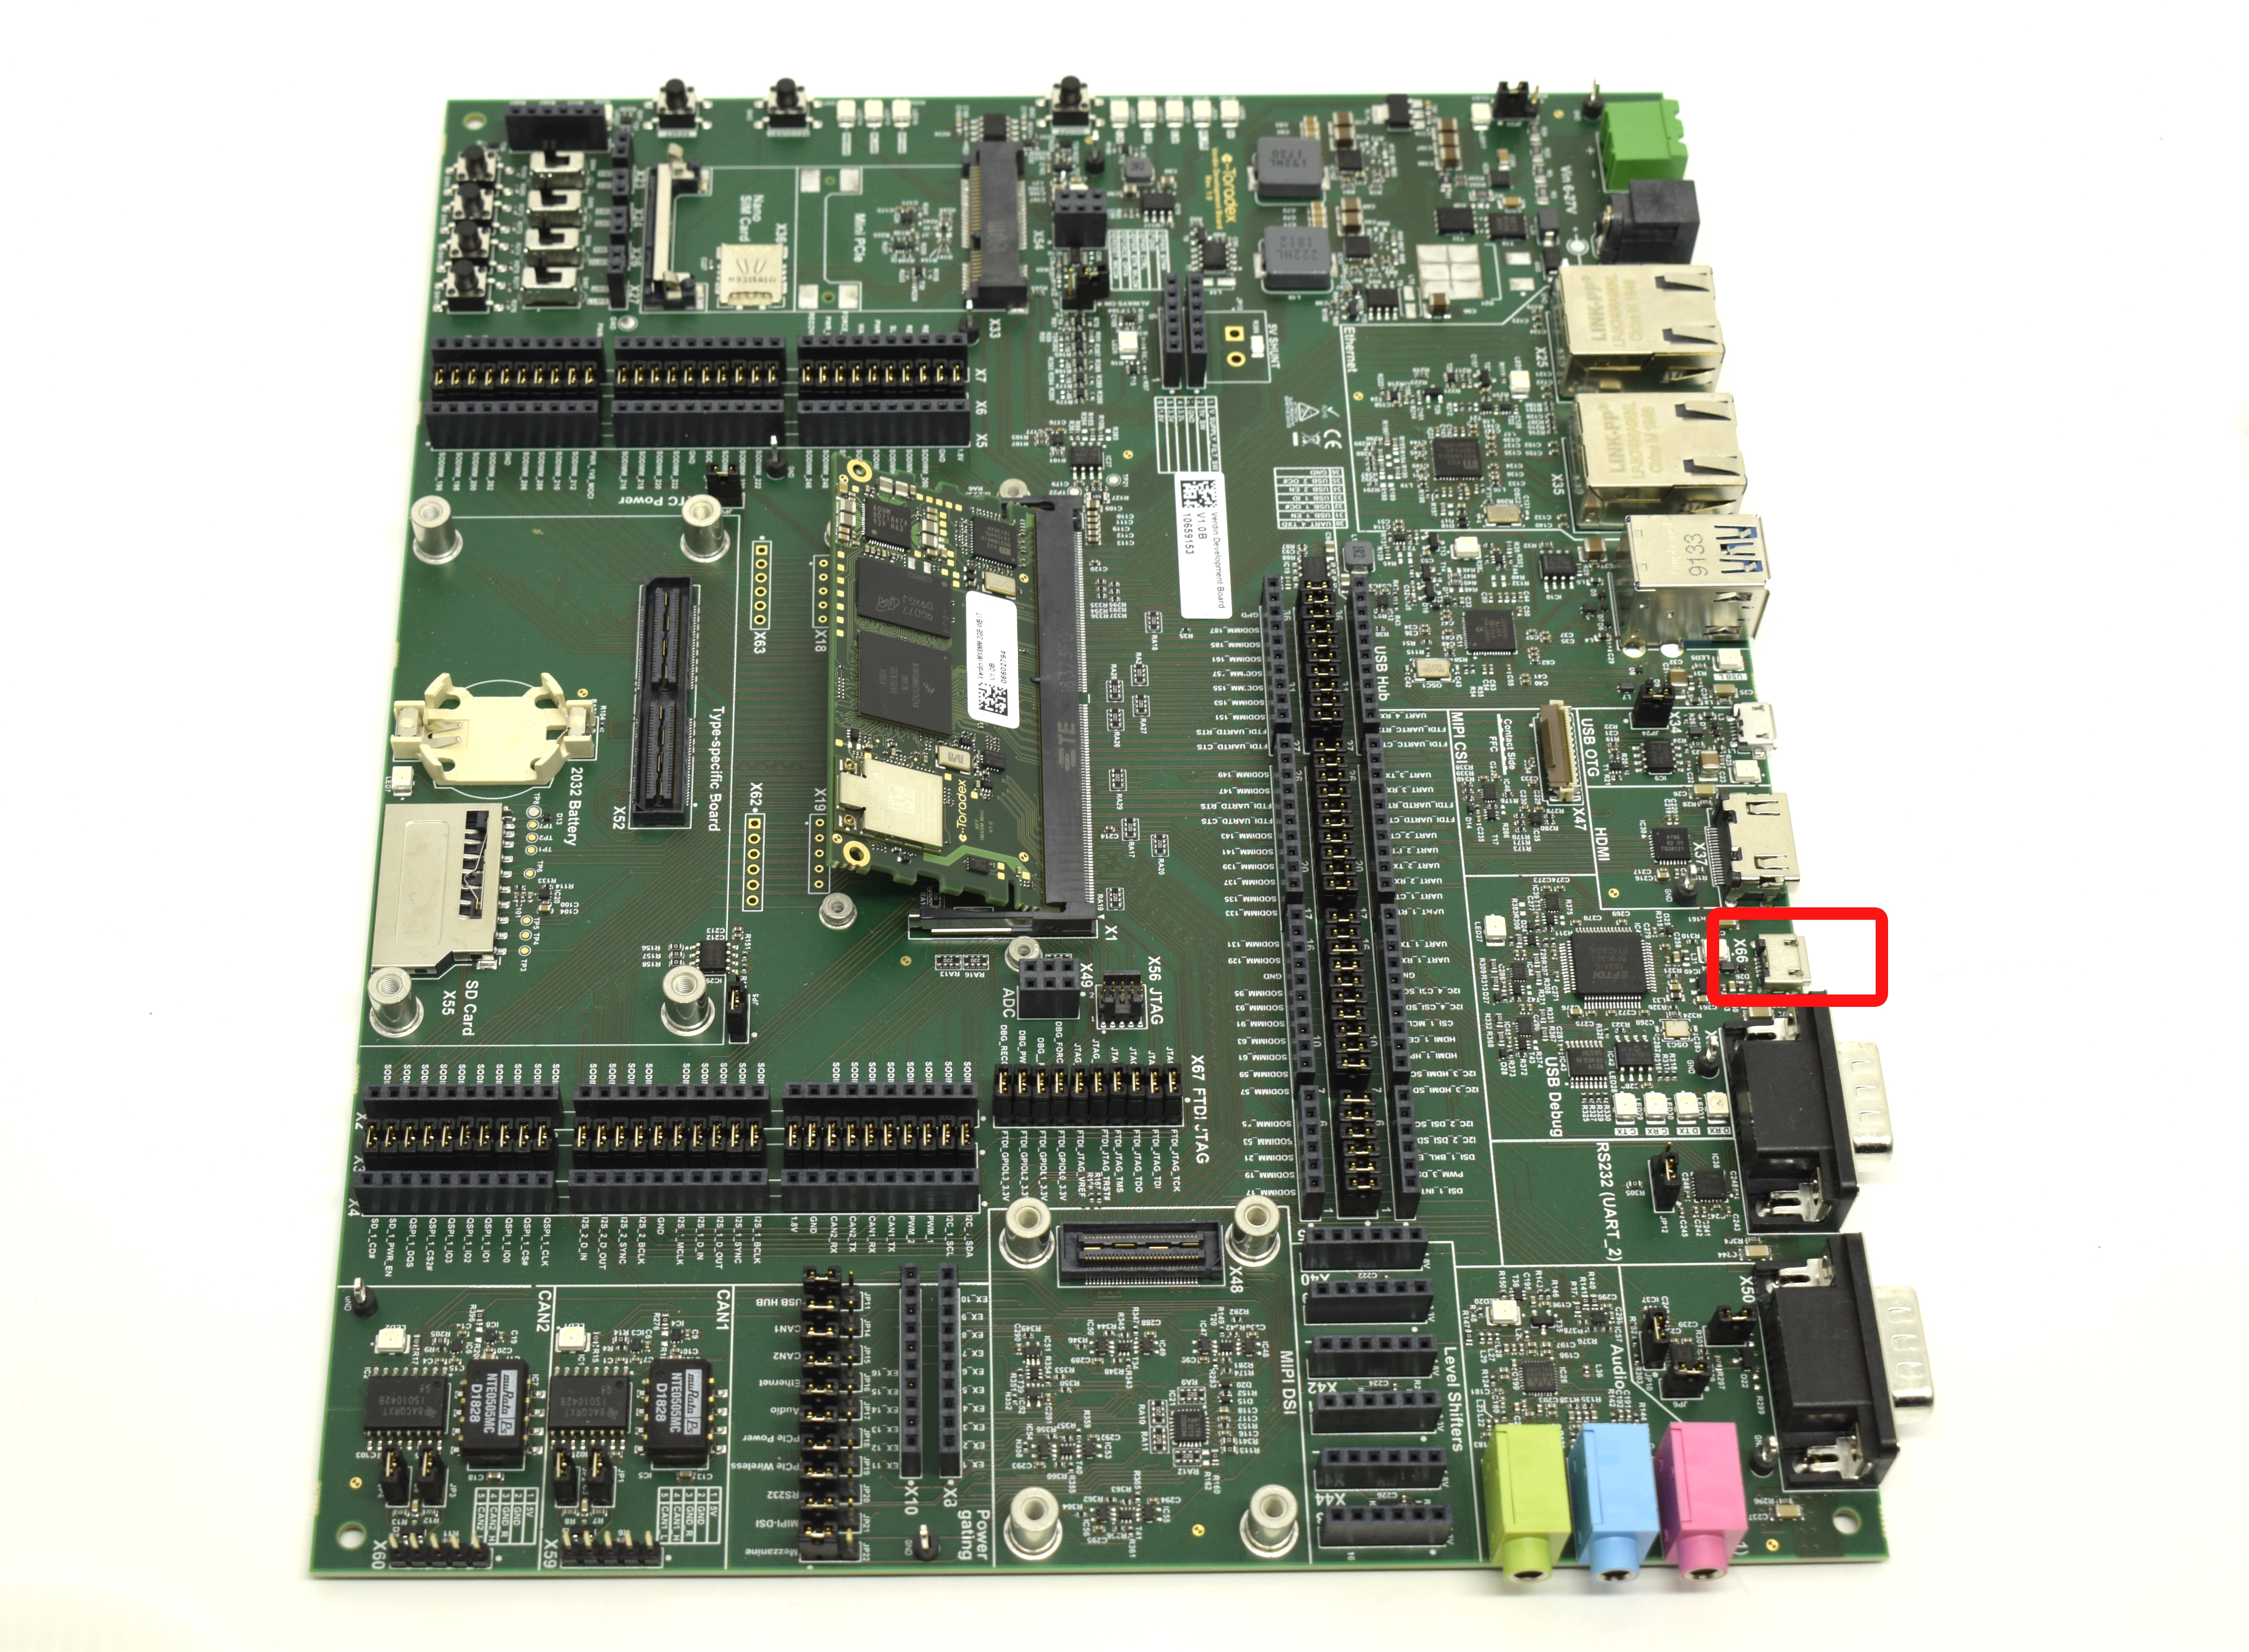
Notice that the USB C connector (X66) has an integrated USB-serial converter that provides access to the computer on module's debug serial port.
Verdin has an integrated Serial-to-USB converter that lists 4 serial ports on your computer. The highest index is the Linux serial console. Example, if you see /dev/ttyUSB0, /dev/ttyUSB1, /dev/ttyUSB2 and /dev/ttyUSB3 listed, then /dev/ttyUSB3 is the serial console. The same logic applies to Windows COM ports.
If you connect to the first or the second port (for example /dev/ttyUSB0 or /dev/ttyUSB1), you will not be able to use the board. This happens because those ports are dedicated to power/reset control and FTDI JTAG. Just close those connections and reset the board.
Connect a USB C to USB Type-A cable to J5.
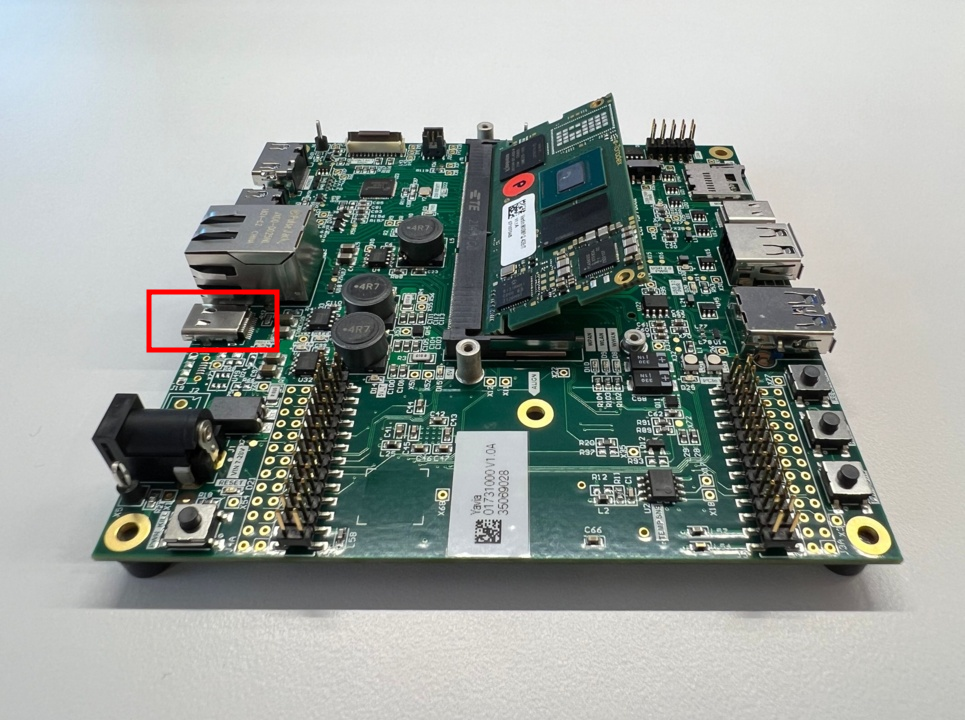
Notice that the USB C connector (J5) has an integrated USB-serial converter that provides access to the computer on module's debug serial port.
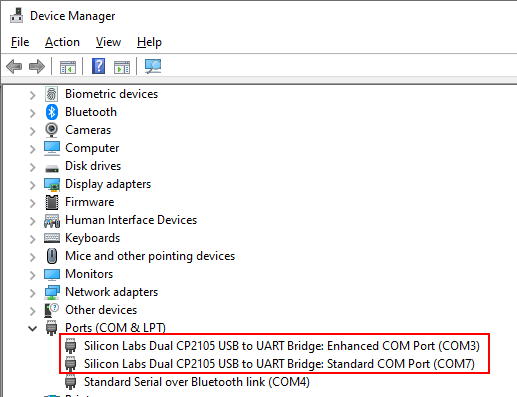
The Yavia has an integrated Serial-to-USB converter that lists 2 serial ports on your computer. The lowest index is the serial console. For example, if you see You can Download the CP210x Windows Drivers with Serial Enumerator and install it. Use the first port that will appear in the Device Manager (COM3 in the image below) to connect to the Verdin using the standard configuration./dev/ttyUSB0 and /dev/ttyUSB1 listed, then /dev/ttyUSB0 is the serial console. The same logic applies to Windows COM ports.Problems using Yavia's Serial Debug with Windows?
Connect a USB C to USB Type-A cable to J23.
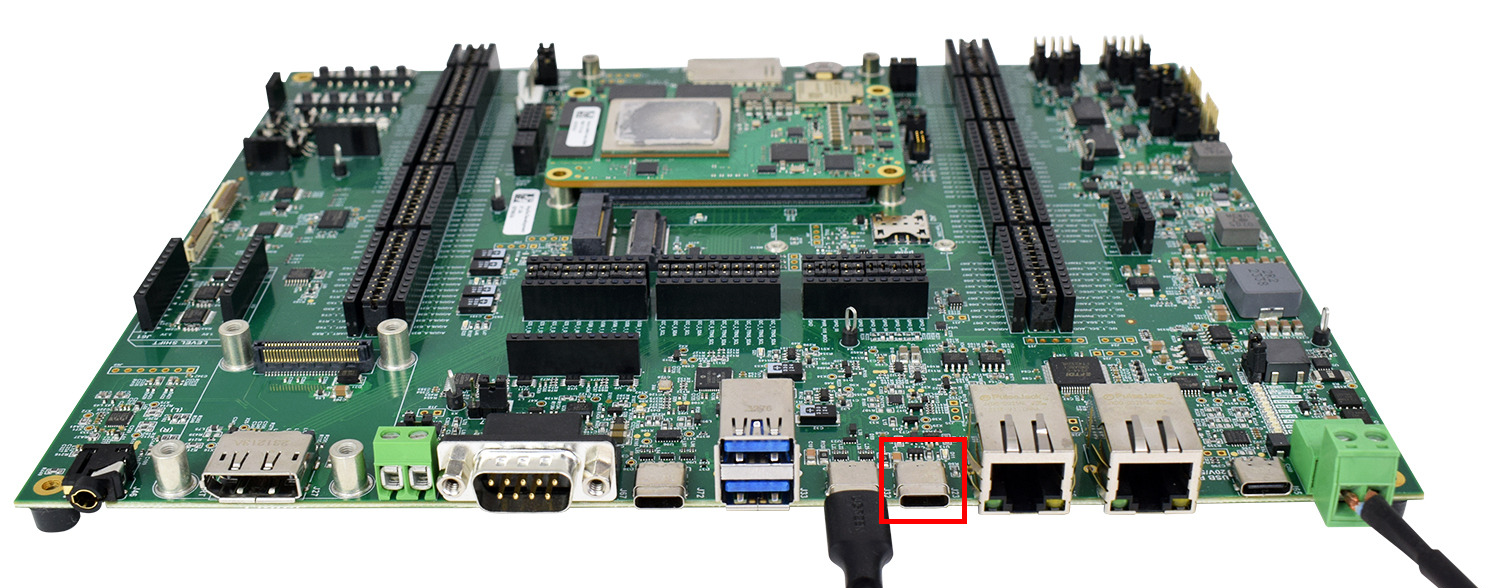
Notice that the USB C connector (J23) has an integrated USB-serial converter that provides access to the computer on module's debug serial port.
The Aquila Evaluation Board has an integrated Serial-to-USB converter that lists 4 serial ports on your computer. The highest index is the serial console. For example, if you see /dev/ttyUSB0, /dev/ttyUSB1, /dev/ttyUSB2 and /dev/ttyUSB3 listed, then /dev/ttyUSB3 is the serial console. The same logic applies to Windows COM ports.
If you connect to the first or the second port (for example /dev/ttyUSB0 or /dev/ttyUSB1), you will not be able to use the board. This happens because those ports are dedicated to power/reset control and FTDI JTAG. Just close those connections and reset the board.
Connect a USB C to USB Type-A cable to J27.
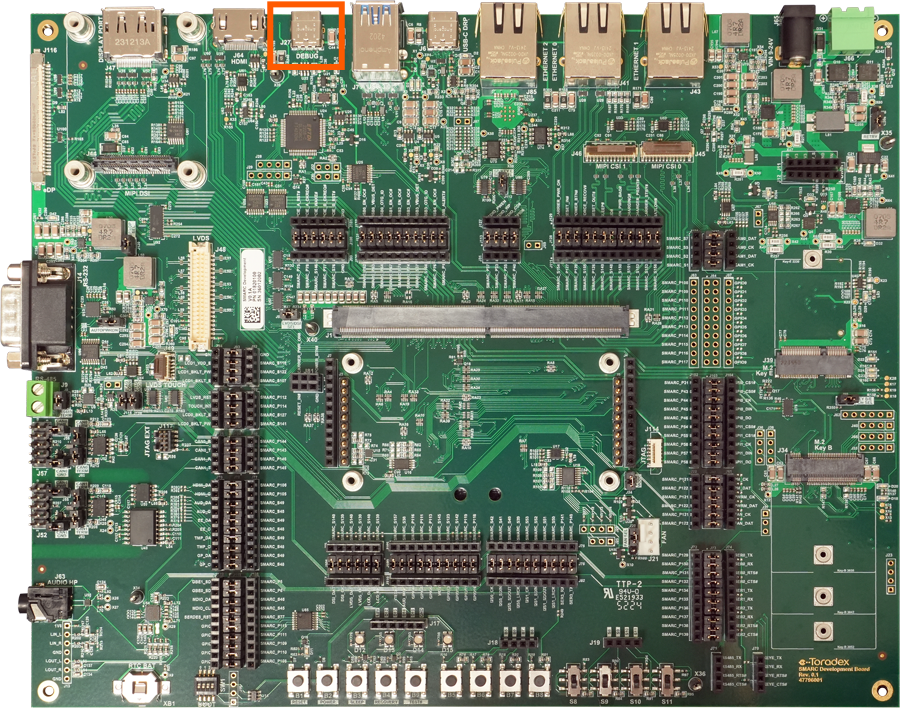
Notice that the USB C connector (J27) has an integrated USB-serial converter that provides access to the computer on module's debug serial port.
The SMARC Development Board has an integrated Serial-to-USB converter that lists 4 serial ports on your computer. The highest index is the serial console. For example, if you see /dev/ttyUSB0, /dev/ttyUSB1, /dev/ttyUSB2 and /dev/ttyUSB3 listed, then /dev/ttyUSB3 is the serial console. The same logic applies to Windows COM ports.
If you connect to the first or the second port (for example /dev/ttyUSB0 or /dev/ttyUSB1), you will not be able to use the board. This happens because those ports are dedicated to power/reset control and FTDI JTAG. Just close those connections and reset the board.
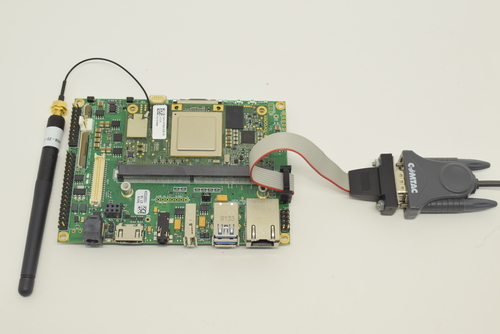
Connect the DB9 to the IDC adapter cable to the X22 connector on the Ixora:
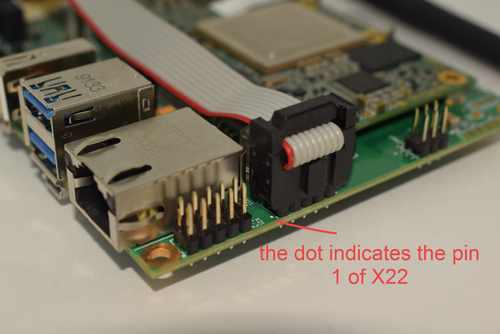
The adapter is included in the Toradex Cable Kit, the standard we used is normally called DTK or Intel standard.
Connect your host machine to the adapter cable using a serial cable or Serial to USB converter (make sure to use a nullmodem-crossover conector to allow the conection between the cable and the adapter):
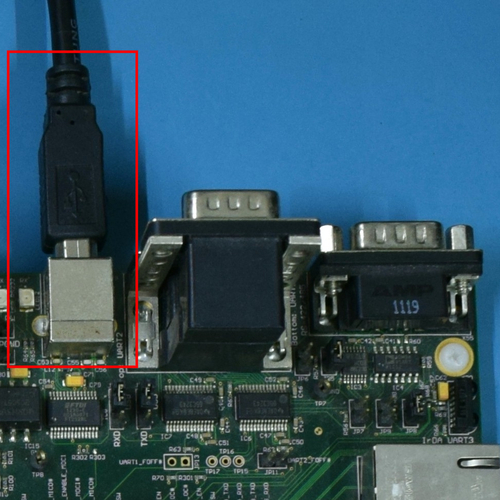
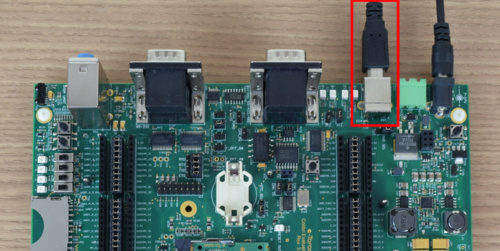
Use UART-1 via the USB Type-B connector X29:
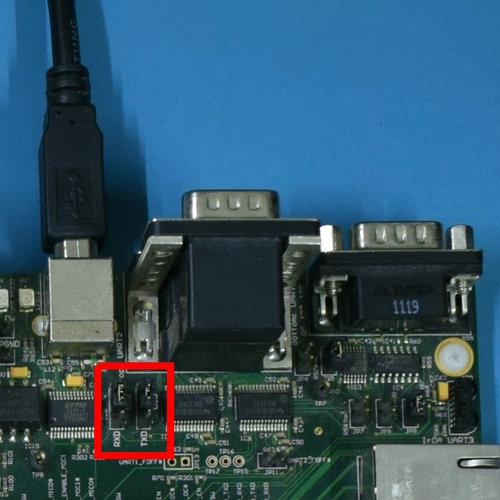
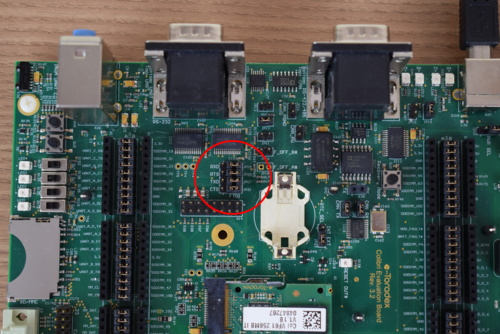
Make sure that the jumpers JP10 and JP12 are set to USB mode as shown in the image below:
Connect the DB9 to the IDC adapter cable to the X13 connector on the Iris:
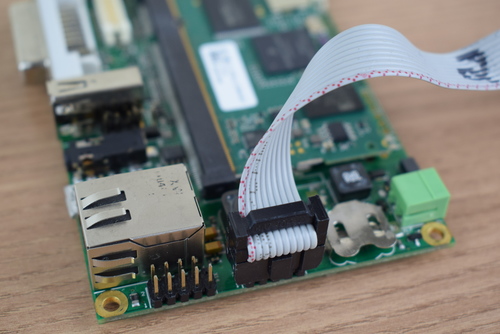
The adapter is included in the Toradex Cable Kit, the standard we used is normally called DTK or Intel standard.
Connect your host machine to the adapter cable using a serial cable or Serial to USB converter (make sure to use a nullmodem-crossover conector to allow the conection between the cable and the adapter):
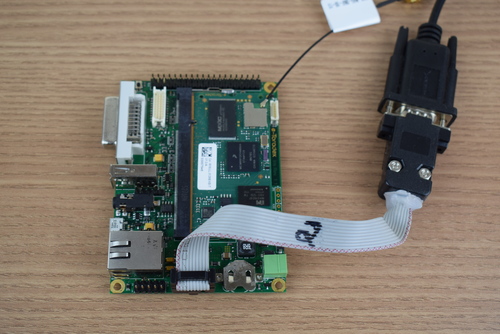
Connect a USB micro-B to USB Type-A cable to X4.
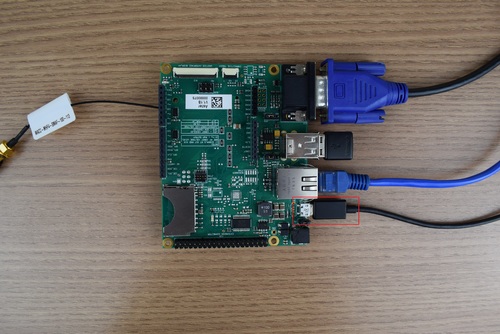
Notice that the micro USB connector (X4) can be employed as a means to power the system and also has an integrated USB-serial converter that provides access to the computer on the module's debug serial port.
Use UART A via the USB Type-B connector X27:
Make sure that the jumpers JP19 and JP17 are set to USB mode as shown in the image below:
Setting up a terminal
In case you want to know how to set up a terminal emulator to start accessing your module, please refer to Serial Terminal Emulator article.
Find my Board IP
To get your board IP address, follow the instructions from the section Find your IP and MAC address on the article Basic Linux Commands.
Examples of why you need your board IP:
- You are connecting to the debug UART because you were unable to login via SSH due to missing the board IP.
- The DHCP tables from your LAN router were refreshed and now the board has a different IP address.
- You want to access a service hosted on the board, for instance, a web server or a remote graphical user interface.
Change the Debug UART (Serial Console) to Another Port
We don't provide instructions on how to do this. We advise you to use either the default Debug Port defined by Toradex or NXP.
For the i.MX 8/8X SoMs which have a System Controller Unit/System Controller Firmware (SCU/SCFW), or other SoMs from the i.MX 8 family (such as the i.MX 8M Mini) which use a BootROM, it may be nearly or even impossible to change the default UART.
Disable the Debug UART (Serial Console)
Here are sections for disabling the console on U-Boot and the Linux kernel. Make sure to check on UART (Linux) the name of the UART interfaces available for your specific SoM before proceeding.
Disable U-Boot Console Output on UART_A
Custom U-Boot
To disable the serial console modifying U-Boot, you need to reconfigure it following some basic steps. Before proceding, you have to install a GNU toolchain:
Prerequisites
Basic Knowledge
Make sure you understand the basic concepts of our Embedded Linux offerings, such as release cycles, distributions and images. Start with the following article:
Install the GNU Toolchain for Hard Float Calling Convention
Select from the tabs below the Embedded Linux BSP release for which you want to install a compatible toolchain:
Beginning with BSP 5, as part of our OpenEmbedded Dunfell update we transitioned to using version 9.3 of the gcc compiler. Arm releases well tested binary toolchains which can be used to cross-compile software for our modules. At the time of this writing, Arm has not released gcc 9.3 compilers as of yet. Therefore, just use the version 9.2 ones for now:
- For 32 bit Arm: gcc-arm-9.2-2019.12-x86_64-arm-none-linux-gnueabihf.tar.xz
- For 64 bit Arm: gcc-arm-9.2-2019.12-x86_64-aarch64-none-linux-gnu.tar.xz
You have to choose to download either the 32 bit or 64 bit Arm cross-toolchain, according to the architecture of your Computer on Module SoC. Select the correct one from the tabs below:
To install the toolchain on your host machine, download and unpack the tar.xz file. From the command-line:
$ cd ~
$ wget -O gcc-arm-9.2-2019.12-x86_64-arm-none-linux-gnueabihf.tar.xz "https://developer.arm.com/-/media/Files/downloads/gnu-a/9.2-2019.12/binrel/gcc-arm-9.2-2019.12-x86_64-arm-none-linux-gnueabihf.tar.xz?revision=fed31ee5-2ed7-40c8-9e0e-474299a3c4ac&la=en&hash=76DAF56606E7CB66CC5B5B33D8FB90D9F24C9D20"
$ tar xvf gcc-arm-9.2-2019.12-x86_64-arm-none-linux-gnueabihf.tar.xz
$ ln -s gcc-arm-9.2-2019.12-x86_64-arm-none-linux-gnueabihf gcc-linaro
The U-Boot and Linux makefiles use the environment variables ARCH/CROSS_COMPILE to configure and call the compiler correctly. Therefore, these environment variables must be exported in any shell instance that will run configure/compile commands to build U-Boot or Linux for the target module.
$ export ARCH=arm
$ export DTC_FLAGS="-@"
$ export PATH=~/gcc-linaro/bin/:$PATH
$ export CROSS_COMPILE=arm-none-linux-gnueabihf-
You can put those commands into a file and source that file to export it more easily, e.g.:
$ echo "export ARCH=arm" >> ~/export_compiler
$ echo "export DTC_FLAGS='-@'" >> ~/export_compiler
$ echo "export PATH=~/gcc-linaro/bin/:$PATH" >> ~/export_compiler
$ echo "export CROSS_COMPILE=arm-none-linux-gnueabihf-" >> ~/export_compiler
$ source ~/export_compiler
To install the toolchain on your host machine, download and unpack the tar.xz file. From the command-line:
$ cd ~
$ wget -O gcc-arm-9.2-2019.12-x86_64-aarch64-none-linux-gnu.tar.xz "https://developer.arm.com/-/media/Files/downloads/gnu-a/9.2-2019.12/binrel/gcc-arm-9.2-2019.12-x86_64-aarch64-none-linux-gnu.tar.xz?revision=61c3be5d-5175-4db6-9030-b565aae9f766&la=en&hash=0A37024B42028A9616F56A51C2D20755C5EBBCD7"
$ tar xvf gcc-arm-9.2-2019.12-x86_64-aarch64-none-linux-gnu.tar.xz
$ ln -s gcc-arm-9.2-2019.12-x86_64-aarch64-none-linux-gnu gcc-linaro
The U-Boot and Linux makefiles use the environment variables ARCH/CROSS_COMPILE to configure and call the compiler correctly. Therefore, these environment variables must be exported in any shell instance that will run configure/compile commands to build U-Boot or Linux for the target module.
$ export ARCH=arm64
$ export DTC_FLAGS="-@"
$ export PATH=~/gcc-linaro/bin/:$PATH
$ export CROSS_COMPILE=aarch64-none-linux-gnu-
You can put those commands into a file and source that file to export it more easily, E.g.:
$ echo "export ARCH=arm64" >> ~/export_compiler
$ echo "export DTC_FLAGS='-@'" >> ~/export_compiler
$ echo "export PATH=~/gcc-linaro/bin/:$PATH" >> ~/export_compiler
$ echo "export CROSS_COMPILE=aarch64-none-linux-gnu-" >> ~/export_compiler
$ source ~/export_compiler
Beginning with BSP 4, as part of our OpenEmbedded Zeus update we transitioned to using version 8.3 of the gcc compiler. Arm releases well tested binary toolchains which can be used to cross-compile software for our modules:
- For 32 bit Arm: gcc-arm-8.3-2019.03-x86_64-arm-linux-gnueabihf.tar.xz
- For 64 bit Arm: gcc-arm-8.3-2019.03-x86_64-aarch64-linux-gnu.tar.xz
You have to choose to download either the 32 bit or 64 bit Arm cross-toolchain, according to the architecture of your Computer on Module SoC. Select the correct one from the tabs below:
To install the toolchain on your host machine, download and unpack the tar.xz file. From the command-line:
$ cd ~
$ wget -O gcc-arm-8.3-2019.03-x86_64-arm-linux-gnueabihf.tar.xz "https://developer.arm.com/-/media/Files/downloads/gnu-a/8.3-2019.03/binrel/gcc-arm-8.3-2019.03-x86_64-arm-linux-gnueabihf.tar.xz?revision=e09a1c45-0ed3-4a8e-b06b-db3978fd8d56&la=en&hash=93ED4444B8B3A812B893373B490B90BBB28FD2E3"
$ tar xvf gcc-arm-8.3-2019.03-x86_64-arm-linux-gnueabihf.tar.xz
$ ln -s gcc-arm-8.3-2019.03-x86_64-arm-linux-gnueabihf gcc-linaro
The U-Boot and Linux makefiles use the environment variables ARCH/CROSS_COMPILE to configure and call the compiler correctly. Therefore, these environment variables must be exported in any shell instance that will run configure/compile commands to build U-Boot or Linux for the target module.
$ export ARCH=arm
$ export PATH=~/gcc-linaro/bin/:$PATH
$ export CROSS_COMPILE=arm-linux-gnueabihf-
You can put those commands into a file and source that file to export it more easily, E.g.:
$ echo "export ARCH=arm" >> ~/export_compiler
$ echo "export PATH=~/gcc-linaro/bin/:$PATH" >> ~/export_compiler
$ echo "export CROSS_COMPILE=arm-linux-gnueabihf-" >> ~/export_compiler
$ source ~/export_compiler
To install the toolchain on your host machine, download and unpack the tar.xz file. From the command-line:
$ cd ~
$ wget -O gcc-arm-8.3-2019.03-x86_64-aarch64-linux-gnu.tar.xz "https://developer.arm.com/-/media/Files/downloads/gnu-a/8.3-2019.03/binrel/gcc-arm-8.3-2019.03-x86_64-aarch64-linux-gnu.tar.xz?revision=2e88a73f-d233-4f96-b1f4-d8b36e9bb0b9&la=en&hash=167687FADA00B73D20EED2A67D0939A197504ACD"
$ tar xvf gcc-arm-8.3-2019.03-x86_64-aarch64-linux-gnu.tar.xz
$ ln -s gcc-arm-8.3-2019.03-x86_64-aarch64-linux-gnu gcc-linaro
The U-Boot and Linux makefiles use the environment variables ARCH/CROSS_COMPILE to configure and call the compiler correctly. Therefore, these environment variables must be exported in any shell instance that will run configure/compile commands to build U-Boot or Linux for the target module.
$ export ARCH=arm64
$ export PATH=~/gcc-linaro/bin/:$PATH
$ export CROSS_COMPILE=aarch64-linux-gnu-
You can put those commands into a file and source that file to export it more easily, E.g.:
$ echo "export ARCH=arm64" >> ~/export_compiler
$ echo "export PATH=~/gcc-linaro/bin/:$PATH" >> ~/export_compiler
$ echo "export CROSS_COMPILE=aarch64-linux-gnu-" >> ~/export_compiler
$ source ~/export_compiler
Beginning with image 3.0, as part of our OpenEmbedded Thud update we transitioned to using version 8.2 of the gcc compiler. Arm releases well tested binary toolchains which can be used to cross-compile software for our modules:
- For 32 bit Arm: gcc-arm-8.2-2019.01-x86_64-arm-linux-gnueabihf.tar.xz
- For 64 bit Arm: gcc-arm-8.2-2019.01-x86_64-aarch64-linux-gnu.tar.xz
You have to choose to download either the 32 bit or 64 bit Arm cross-toolchain, according to the architecture of your Computer on Module SoC. Select the correct one from the tabs below:
To install the toolchain on your host machine, download and unpack the tar.xz file. From the command-line:
$ cd ~
$ wget -O gcc-arm-8.2-2019.01-x86_64-arm-linux-gnueabihf.tar.xz "https://developer.arm.com/-/media/Files/downloads/gnu-a/8.2-2019.01/gcc-arm-8.2-2019.01-x86_64-arm-linux-gnueabihf.tar.xz?revision=c69ea519-a965-4359-84a4-cbd440ff4130&la=en&hash=09C47C70EEE96D17EA036A7A59AE961972320A31"
$ tar xvf gcc-arm-8.2-2019.01-x86_64-arm-linux-gnueabihf.tar.xz
$ ln -s gcc-arm-8.2-2019.01-x86_64-arm-linux-gnueabihf gcc-linaro
The U-Boot and Linux makefiles use the environment variables ARCH/CROSS_COMPILE to configure and call the compiler correctly. Therefore, these environment variables must be exported in any shell instance that will run configure/compile commands to build U-Boot or Linux for the target module.
$ export ARCH=arm
$ export PATH=~/gcc-linaro/bin/:$PATH
$ export CROSS_COMPILE=arm-linux-gnueabihf-
You can put those commands into a file and source that file to export it more easily, E.g.:
$ echo "export ARCH=arm" >> ~/export_compiler
$ echo "export PATH=~/gcc-linaro/bin/:$PATH" >> ~/export_compiler
$ echo "export CROSS_COMPILE=arm-linux-gnueabihf-" >> ~/export_compiler
$ source ~/export_compiler
To install the toolchain on your host machine, download and unpack the tar.xz file. From the command-line:
$ cd ~
$ wget -O gcc-arm-8.2-2019.01-x86_64-aarch64-linux-gnu.tar.xz "https://developer.arm.com/-/media/Files/downloads/gnu-a/8.2-2019.01/gcc-arm-8.2-2019.01-x86_64-aarch64-linux-gnu.tar.xz?revision=21270570-4ec0-4bad-a9e1-09707614066a&la=en&hash=AFEDF645AF5B94336DB4E1E608806CEC87A02B8A"
$ tar xvf gcc-arm-8.2-2019.01-x86_64-aarch64-linux-gnu.tar.xz
$ ln -s gcc-arm-8.2-2019.01-x86_64-aarch64-linux-gnu gcc-linaro
The U-Boot and Linux makefiles use the environment variables ARCH/CROSS_COMPILE to configure and call the compiler correctly. Therefore, these environment variables must be exported in any shell instance that will run configure/compile commands to build U-Boot or Linux for the target module.
$ export ARCH=arm64
$ export PATH=~/gcc-linaro/bin/:$PATH
$ export CROSS_COMPILE=aarch64-linux-gnu-
You can put those commands into a file and source that file to export it more easily, E.g.:
$ echo "export ARCH=arm64" >> ~/export_compiler
$ echo "export PATH=~/gcc-linaro/bin/:$PATH" >> ~/export_compiler
$ echo "export CROSS_COMPILE=aarch64-linux-gnu-" >> ~/export_compiler
$ source ~/export_compiler
Beginning with image 2.8, as part of our OpenEmbedded Rocko update we transitioned to using version 7.3 of the gcc compiler. Linaro releases well tested binary toolchains which can be used to cross-compile software for our modules:
- For 32 bit Arm: gcc-linaro-7.3.1-2018.05-x86_64_arm-linux-gnueabihf.tar.xz
- For 64 bit Arm: Embedded Linux BSP 2.8 does not support any 64 bit Arm SoMs by Toradex.
https://releases.linaro.org/components/toolchain/binaries/7.3-2018.05/arm-linux-gnueabihf/
To install the toolchain on your host machine, download and unpack the tar.xz file. From the command-line:
$ cd ~
$ wget -O gcc-linaro-7.3.1-2018.05-x86_64_arm-linux-gnueabihf.tar.xz "https://releases.linaro.org/components/toolchain/binaries/7.3-2018.05/arm-linux-gnueabihf/gcc-linaro-7.3.1-2018.05-x86_64_arm-linux-gnueabihf.tar.xz"
$ tar xvf gcc-linaro-7.3.1-2018.05-x86_64_arm-linux-gnueabihf.tar.xz
$ ln -s gcc-linaro-7.3.1-2018.05-x86_64_arm-linux-gnueabihf gcc-linaro
The U-Boot and Linux makefiles use the environment variables ARCH/CROSS_COMPILE to configure and call the compiler correctly. Therefore, these environment variables must be exported in any shell instance that will run configure/compile commands to build U-Boot or Linux for the target module.
$ export ARCH=arm
$ export PATH=~/gcc-linaro/bin/:$PATH
$ export CROSS_COMPILE=arm-linux-gnueabihf-
You can put those commands into a file and source that file to export it more easily, E.g.:
$ echo "export ARCH=arm" >> ~/export_compiler
$ echo "export PATH=~/gcc-linaro/bin/:$PATH" >> ~/export_compiler
$ echo "export CROSS_COMPILE=arm-linux-gnueabihf-" >> ~/export_compiler
$ source ~/export_compiler
Beginning with image 2.7b2, as part of our OpenEmbedded Morty update we transitioned to using version 6.2 of the gcc compiler. Linaro releases well tested binary toolchains which can be used to cross-compile software for our modules (choose gcc-linaro-6.2.1-2016.11-x86_64_arm-linux-gnueabihf.tar.xz):
https://releases.linaro.org/components/toolchain/binaries/6.2-2016.11/arm-linux-gnueabihf/
Beginning with image V2.6, as part of our OpenEmbedded Jethro update we transitioned to using version 5.2 of the gcc compiler. Linaro releases well tested binary toolchains which can be used to cross-compile software for our modules (choose gcc-linaro-5.2-2015.11-2-x86_64_arm-linux-gnueabihf.tar.xz):
https://releases.linaro.org/components/toolchain/binaries/5.2-2015.11-2/arm-linux-gnueabihf/
Beginning with image V2.0, we transitioned to using the hard-float ABI:
https://releases.linaro.org/archive/14.11/components/toolchain/binaries/
Note: Since the 14.11 release Linaro only provides x86_64 toolchains. If you use 32-bit Linux on your host machine (check using uname -m), you can still download the older 14.09 release which is still 32-bit:
https://releases.linaro.org/archive/14.09/components/toolchain/binaries/
You have to choose to download either the 32 bit or 64 bit Arm cross-toolchain, according to the architecture of your Computer on Module SoC. Select the correct one from the tabs below:
The U-Boot and Linux makefiles use the environment variables ARCH/CROSS_COMPILE to configure and call the compiler correctly. Therefore, these environment variables must be exported in any shell instance that will run configure/compile commands to build U-Boot or Linux for the target module.
$ export ARCH=arm
$ export PATH=~/gcc-linaro/bin/:$PATH
$ export CROSS_COMPILE=arm-linux-gnueabihf-
You can put those commands into a file and source that file to export it more easily, E.g.:
$ echo "export ARCH=arm" >> ~/export_compiler
$ echo "export PATH=~/gcc-linaro/bin/:$PATH" >> ~/export_compiler
$ echo "export CROSS_COMPILE=arm-linux-gnueabihf-" >> ~/export_compiler
$ source ~/export_compiler
Other Tools and Dependencies
Embedded Linux BSP 5
Build Host Tools and Dependencies
You need some essential build tools to compile the Kernel or DTC. Most are likely part of your distro's standard install.
For Fedora:
$ sudo dnf install bc gcc git ncurses-devel lzop make perl openssl-devel bison flex diffutils
For Debian/Ubuntu:
$ sudo apt-get install bc build-essential git libncurses5-dev lzop perl libssl-dev bison flex
Device Tree Compiler (DTC) Tool
U-Boot and the device tree overlays compilation for some modules needs a device tree compiler (DTC). We recommend DTC version 1.6.0 or higher.
You can build the latest version (DTC 1.6.0 at the time of writing) from the source:
$ git clone git://git.kernel.org/pub/scm/utils/dtc/dtc.git -b v1.6.0 ~/dtc
$ cd ~/dtc
$ make
$ export PATH=$HOME/dtc/:$PATH
on Fedora and on Ubuntu 22.04, there have been reported DTC build errors libfdt/libfdt.h:251:28: warning: array subscript ‘struct fdt_header[0]’ is partly outside array bounds of ‘unsigned char[4]’ [-Warray-bounds].
To disable treating errors as warnings, you can remove the flag -Werror from the CFLAGS on the Makefile.
We have not evaluated the consequences of doing it, do it at your own risk!
U-Boot Tools
The uImage target of the Linux kernel compilation needs a recent mkimage tool.
One can install the Fedora package uboot-tools:
$ sudo dnf install uboot-tools
Or with the corresponding Debian/Ubuntu package u-boot-tools:
$ sudo apt-get install u-boot-tools
Alternatively, mkimage tool is also built during the U-Boot compilation. You can follow the U-Boot building instructions as explained further in this article, and after that, include it in PATH.
Older Versions
U-Boot Tools
The uImage target of the Linux kernel compilation needs a recent mkimage tool.
One can simply install the Fedora package uboot-tools:
$ sudo dnf install uboot-tools
Or with the corresponding Debian/Ubuntu package u-boot-tools:
$ sudo apt-get install u-boot-tools
Alternatively, mkimage tool is also built during the U-Boot compilation. You can follow the U-Boot building instructions as explained further in this article, and after that include it in PATH.
Build Host Tools and Dependencies
You need some essential build tools to compile the Kernel. Most are likely part of your distro's standard install.
For Fedora:
$ sudo dnf install bc gcc git ncurses-devel lzop make perl openssl-devel
For Debian/Ubuntu:
$ sudo apt-get install bc build-essential git libncurses5-dev lzop perl libssl-dev
Accordingly to the official documentation of U-boot regarding to silencing the console, the following config options need to be defined in the respective board header file to achieve the goal:
CONFIG_SILENT_CONSOLE
CONFIG_SYS_DEVICE_NULLDEV
CONFIG_SILENT_CONSOLE_UPDATE_ON_RELOC
CONFIG_SILENT_CONSOLE_UPDATE_ON_SET
So, follow the next steps to silence the serial terminal:
- Get the U-boot source code:
$ mkdir -p ~/workdir
$ cd ~/workdir
$ git clone -b <branch> git://git.toradex.com/u-boot-toradex.git
Replace <branch> by the U-Boot Git Branch for your specific configuration. You can find the version information here.
- Go to
u-boot-toradex/configsand modify thedefconfigfile of the respective board (for example, for colibri iMX8X:u-boot-toradex/configs/colibri-imx8x_defconfig) by adding and setting the variables at the end of the file as shown below:
...
CONFIG_SILENT_CONSOLE=y
CONFIG_SYS_DEVICE_NULLDEV=y
CONFIG_SILENT_CONSOLE_UPDATE_ON_RELOC=y
...
- Define the variables at the board's config header, located at
include/configs(for example, for colibri iMX8X:/include/configs/colibri-imx8x.h):
#define CONFIG_SILENT_CONSOLE
#define CONFIG_SYS_DEVICE_NULLDEV
#define CONFIG_SILENT_CONSOLE_UPDATE_ON_RELOC
#define CONFIG_BOARD_EARLY_INIT_F 1
- For enabling silent console, append the environment variable 'silent=1' to CONFIG_EXTRA_ENV_SETTINGS in the respective board header file:
#define CONFIG_EXTRA_ENV_SETTINGS \
	BOOTENV \
	AHAB_ENV \
	M4_BOOT_ENV \
	MEM_LAYOUT_ENV_SETTINGS \
	...
	"silent=1\0"\
- Compile, deploy and integrate the modifications of the U-boot. Please refer to the following article concerning the setup/compilation of the same: Build U-Boot and Linux Kernel from Source Code.
Enabling silent console just bypasses the console messages to null. Depending on the module type and U-Boot version you might still be able to interrupt U-Boot by pressing the specified key which allows you to control the U-Boot at run time.
Disable most Log Messages from Linux Kernel
To get fewer debug messages from the Linux Kernel one can use the "quiet" Kernel parameter.
# setenv tdxargs '${tdxargs} quiet'
# saveenv
Disable Linux Kernel Console Output on UART_A
Disable the console from the kernel completely by setting the console= option on the kernel command line. This can be achieved by doing it from the U-Boot prompt or using U-Boot-envtools under Linux to modify the env variables:
# setenv tdxargs 'console=null'
# saveenv
or using U-Boot-envtools under Linux:
# fw_setenv tdxargs 'console=null'
# reboot
After this, no kernel messages/serial login are available on debug serial port anymore. To re-enable the debug serial port console one needs to reset the 'console' variable back to the respective serial TTY (e.g: ttyLP0 on Colibri VFxx).
# setenv tdxargs 'console=ttyLP0'
# saveenv
or using U-Boot-envtools under Linux:
# fw_setenv tdxargs 'console=ttyLP0'
# reboot
Configure Baudrate for Serial Getty on UART_A
While during boot the serial baudrate is taken from the U-Boot environment variable baudrate, the later login shell baudrate needs to be configured separately if required in respective /etc/systemd/system/getty.target.wants/serial-getty@<serial device>.service file:
- i.MX 6/7:
/etc/systemd/system/getty.target.wants/serial-getty@ttymxc0.service - Tegras:
/etc/systemd/system/getty.target.wants/serial-getty@ttyS0.service
Disable Serial Getty on UART_A
An explicit serial getty is always started on UART_A which can be disabled by masking it as follows:
# systemctl mask serial-getty@ttymxc0.service
An interesting blog post from Mr. Poettering about the thematic can be found here.