Multiple Containers Application Development
Introduction
This article explains how to develop an application composed of multiple Torizon IDE extension projects.
In many cases, the application intended to be executed on the SoM consists of more than one individual application. For example, you may have a C application that interacts with sensors to collect data, a TensorFlow Lite (Python) application that performs inference on that data and produces some output, and a Qt C++ application that displays this output on a screen.
In this example, your application would require three different Torizon IDE extension projects. However, a multiple‐container project allows you to integrate these three projects into one workspace, enabling you to run and debug them simultaneously, making it one unified project.
This article complies with the Typographic Conventions for Torizon Documentation.
Prerequisites
- A board with Torizon OS installed.
- Set up the Torizon IDE extension environment.
- Connect a Torizon OS target device.
- Having created a multi-container Torizon project.
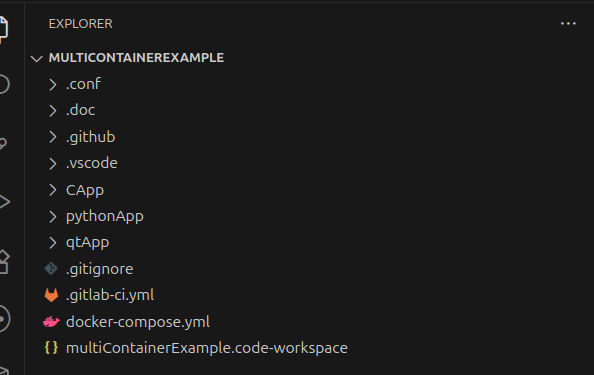
Multi-Container Project Folder Structure
In a multi-container project, the root folder <project-name> (also referred to as <workspace-name>) contains files specific to the multi-container project, along with separate folders for each single-container project, as shown below:

Multi-root VSCode Workspace
Because there are multiple single-container projects, each of which is a VSCode Workspace, the multi-container project is a Multi-root Workspace.
In multi-root workspaces, tasks, launch configurations, and settings are not defined in the .vscode/tasks.json, .vscode/launch.json, and .vscode/settings.json files, respectively.
Instead, they are defined in the corresponding sections of the multi-root workspace specific file, which is the <project-name>.code-workspace file (.vscode/tasks.json may be an exception in this template, as will be explained).
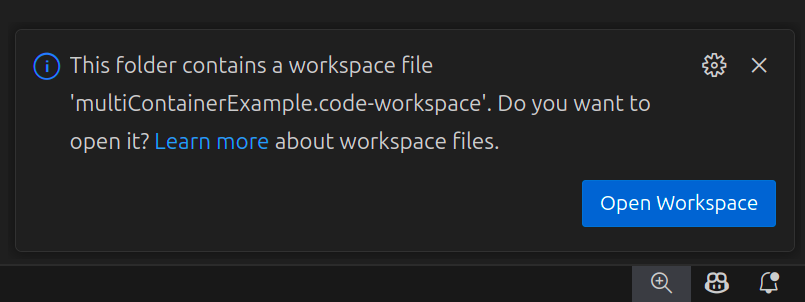
To open the multi-container project, open the root folder <project-name> in VS Code. Sometimes, when opening the project's folder, VS Code may not automatically launch in Multi-root Workspace mode, as shown in the image below
(this, more specifically, happens when the root folder is opened through File > Open Folder..., instead of throughFile > Open Workspace from File...).
In that case, VS Code detects the presence of a .code-workspace file in the opened folder and suggests opening the multi-root workspace on a notification in the bottom right corner:
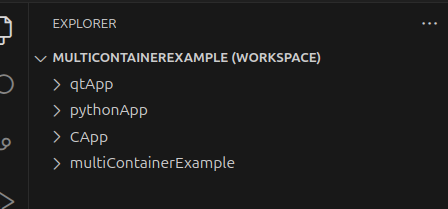
Then, when it is on the Multi-root Workspace mode, the root folder name is suffixed with (WORKSPACE), as shown below:
Multi-Container Folder
The <project-name> folder contains the specific files for a multi-container project.
.code-workspace File
The <project-name>.code-workspace file is specific to a multi-root workspace, and it defines the tasks, launch configurations, and settings for that workspace.
When developing a multi-container project, the preferred place to define tasks, launch configurations, and settings should be in their respective fields in the <project-name>.code-workspace file. This, however, is not mandatory, as will be explained below.
Tasks, launch configurations, and settings that apply only to a specific single-container project can be defined in that project’s .vscode/tasks.json, .vscode/launch.json, and .vscode/settings.json files, just like in single-container projects.
It's also possible to define tasks, launch configurations, and settings for the multi-container in these files inside the Multi-container folder.
.vscode/tasks.json
Although tasks can be placed in the tasks section of <project-name>.code-workspace, in this specific template they are located in .vscode/tasks.json to keep <project-name>.code-workspace smaller and more concise.
Scripts in .conf
Multi-container projects include scripts that perform tasks specific to multi-container setups, such as check-single-projects-conflicts.xsh. They also include scripts that perform tasks present in single-containers, such as project-updater.xsh, which in this case updates the multi-container-specific files.
docker-compose.yml
There is also a docker-compose.yml file, which is used to orchestrate the execution of all single-container applications together.
It can be thought of as the union of each single-container docker-compose.yml, avoiding duplication. For example, if two single-container docker-compose.yml files include a weston service, it appears only once in the multi-container docker-compose.yml.
However, orchestrating multiple applications is not always straightforward and may require manual editing of the multi-container docker-compose.yml.
Below is an example of the docker-compose.yml for the multi-container project created above:
services:
  pythonapp-debug:
    image: ${LOCAL_REGISTRY}:5002/pythonapp-debug:${TAG}
    ports:
      - ${DEBUG_SSH_PORT}:${DEBUG_SSH_PORT}
      - ${DEBUG_PORT1}:${DEBUG_PORT1}
  pythonapp:
    image: ${DOCKER_LOGIN}/pythonapp:${TAG}
  qtapp-debug:
    image: ${LOCAL_REGISTRY}:5002/qtapp-debug:${TAG}
    ports:
      - ${DEBUG_SSH_PORT}:${DEBUG_SSH_PORT}
      - ${DEBUG_PORT1}:${DEBUG_PORT1}
      - ${DEBUG_PORT2}:${DEBUG_PORT2}
    volumes:
      - type: bind
        source: /tmp
        target: /tmp
      - type: bind
        source: /dev
        target: /dev
    device_cgroup_rules:
      - c 4:* rmw
      - c 13:* rmw
      - c 199:* rmw
      - c 226:* rmw
    depends_on:
      - weston
  qtapp:
    image: ${DOCKER_LOGIN}/qtapp:${TAG}
    volumes:
      - type: bind
        source: /tmp
        target: /tmp
      - type: bind
        source: /dev
        target: /dev
    device_cgroup_rules:
      - c 4:* rmw
      - c 13:* rmw
      - c 199:* rmw
      - c 226:* rmw
    depends_on:
      - weston
  weston:
    image: torizon/weston${GPU}:4
    environment:
      - ACCEPT_FSL_EULA=1
    network_mode: host
    volumes:
      - type: bind
        source: /tmp
        target: /tmp
      - type: bind
        source: /dev
        target: /dev
      - type: bind
        source: /run/udev
        target: /run/udev
    cap_add:
      - CAP_SYS_TTY_CONFIG
    device_cgroup_rules:
      - c 4:* rmw
      - c 13:* rmw
      - c 199:* rmw
      - c 226:* rmw
      - c 253:* rmw
  capp-debug:
    image: ${LOCAL_REGISTRY}:5002/capp-debug:${TAG}
    ports:
      - ${DEBUG_SSH_PORT}:${DEBUG_SSH_PORT}
  capp:
    image: ${DOCKER_LOGIN}/capp:${TAG}
Connect a Target Device
In multi-container projects, connecting to a target device is handled the same way as in single-container projects.
When the target device is set as the host, the host address is added to the settings section of the <project-name>.code-workspace file, as shown below. This differs from a single-container project, where the .vscode/settings.json file is updated.
"settings": {
	"torizon_workspace": "${workspaceFolder}",
	"torizon.gpuPrefixRC": true,
	"files.exclude": {
		"pythonApp": true,
		"qtApp": true,
		"CApp": true
	},
	"containers.environment": {
		"DOCKER_HOST": "tcp://192.168.31.242:2375"
	}
},
Debug Multiple Applications Simultaneously
In VS Code multi-root workspaces, you can define compound launch configurations, allowing you to launch multiple debug sessions simultaneously..
In VS Code’s Debug tab (shown below), you can see all single-container launch configurations, and at the end you’ll also see Launch Project arm64 and Launch Project arm32.
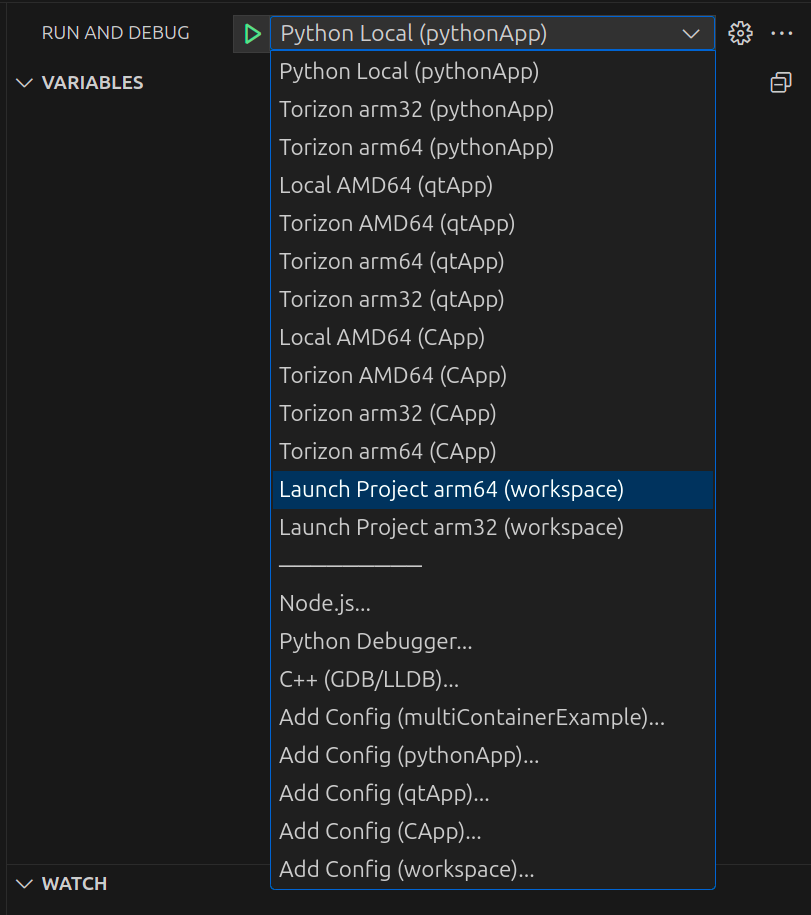
These are compound launch configurations that invoke the launch configurations of each individual single-container project simultaneously. They are defined in the launch section of the <project-name>.code-workspace file.
"launch": {
	"configurations": [],
	"compounds": [
		{
			"name": "Launch Project arm64",
			"configurations": [
				{
					"folder": "pythonApp",
					"name": "Torizon arm64"
				},
				{
					"folder": "qtApp",
					"name": "Torizon arm64"
				},
				{
					"folder": "CApp",
					"name": "Torizon arm64"
				}
			],
			"preLaunchTask": "check-single-projects-conflicts"
		},
		{
			"name": "Launch Project arm32",
			"configurations": [
				{
					"folder": "pythonApp",
					"name": "Torizon arm32"
				},
				{
					"folder": "qtApp",
					"name": "Torizon arm32"
				},
				{
					"folder": "CApp",
					"name": "Torizon arm32"
				}
			],
			"preLaunchTask": "check-single-projects-conflicts"
		}
	]
},
To handle debug port conflicts and avoid race conditions, the check-single-projects-conflicts task runs, highlighting any duplicate port numbers between the single-container projects. It also checks for matching wait_sync setting values across the projects (which are used to introduce different delays in certain pipeline tasks to prevent race conditions).
Additionally, the docker-compose.yml used to run the application containers on the board is the multi-container one. The "torizon_workspace": "${workspaceFolder}" setting in the <project-name>.code-workspace file ensures that this file is used.