Secure Boot on Torizon OS
Secure Boot is an Early Access feature. It means that:
- Breaking changes may be introduced at any given time, irrespective of the Toradex Embedded Linux Support Strategy.
- Software support and functionality are limited.
Introduction
This article is a guide on how to enable and use Secure Boot on Torizon OS.
Prerequisites
- A supported Toradex SoM
- Basic knowledge of the Yocto Project/OpenEmbedded
What is Secure Boot
Secure Boot, for the sake of this article, is the process of booting an image that comes from a valid trusted source (authenticity check) while ensuring it has not been modified in any way (integrity check). The actual artifact used for booting - the Torizon OS image with Secure Boot support enabled - is referred to as the Secure Boot image.
Signing software components is a means to ensure authenticity and integrity, and thus to implement Secure Boot. The individual or company releasing the software has a securely stored Private Key that signs software artifacts at build time, and the corresponding Public Key is used to validate those artifacts at runtime on the devices.
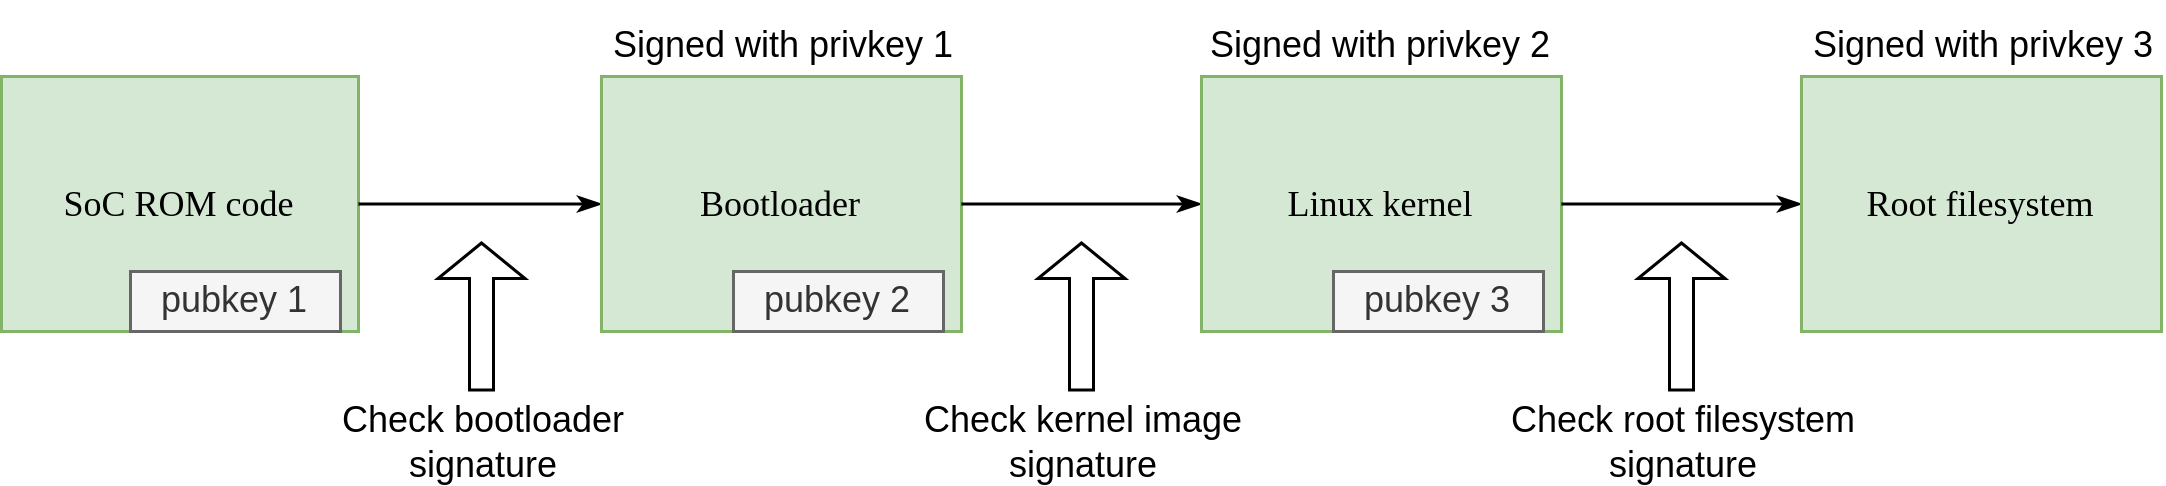
Since the artifacts must be sequentially validated during the boot process, it is common to refer to a Chain of Trust (CoT). In summary, it is a process where one bootable artifact possesses the public key and thus is capable of validating the integrity and authenticity of the next one that will be loaded by the system. For example, the ROM firmware has the bootloader public key, and it validates it before booting, and in turn, the bootloader validates the kernel FIT image, which then validates the root filesystem.
To ensure that the first stage of installable software is signed, the corresponding public key must be stored on the device in a way that it cannot be changed, which is usually done by executing one-time operations on Efuses. The process of burning the Efuse that effectively enables Secure Boot is often referred to as closing the device.
Secure Boot in Other Contexts
Depending on the source and context, some texts refer to Secure Boot, Verified Boot, Measured Boot, and Chain of Trust with different technical scopes and names. In this article's context, Secure Boot is a generic and embracing term that focuses on the validation of authenticity and integrity of embedded Linux systems, as already explained in the previous section. Related terms with different meanings are often described below, although there may even exist others:
- Secure Boot as implemented by Microsoft, often referred to as UEFI Secure Boot, and commonly employed in x86 consumer devices has been the first implementation of Secure Boot and it targets only PCs. It is a method for validating bootloader and kernel artifacts with an asymmetric key. The term became more widely used and the original scope of UEFI and PC became a subset of broader Secure Boot definitions adopted in other places.
- Verified Boot as implemented by Android and commonly used in smartphones, including the Android Verified Boot (AVB) reference implementation, is comparable to Secure Boot from the standpoint that both aim to secure the boot process. The Verified Boot as defined by Android includes the bootloader and boot partition, and also some filesystem partitions, by establishing a Chain of Trust.
- Verified Boot in other sources - and a more generic definition - is the process of using asymmetric cryptography to verify the boot's integrity and authenticity. From this standpoint, Secure Boot implementations that rely on asymmetric cryptography can be considered a type of Verified Boot.
What Secure Boot Isn't
Encryption isn't in the scope of Secure Boot as a mandatory component, although they can both be employed together. Anyone with access to an unencrypted secure boot image can check its contents. It is a topic outside the scope of this article.
The integrity and authenticity of the RAM are not covered by Secure Boot, and after something is loaded to the RAM, it isn't protected by Secure Boot against attacks.
Secure Boot is a broad topic and it isn't in the scope of this article to explain it in-depth.
Toradex Secure Boot Implementation
This section provides a high-level overview of the Secure Boot implementation carried out by Toradex. A phased implementation is being adopted to incrementally secure the system components over time, and thus different CoT coverage levels are defined specific to this implementation:
- Minimal Chain of Trust (MCoT): only the first link of the chain is present whereby the signed bootloader is validated by the ROM code.
- Basic Chain of Trust (BCoT): the chain extends to the second link of the chain such that the kernel artifacts are signed and validated as well; additionally, U-Boot is hardened to enhance security (see below).
- Extended Chain of Trust (ECoT): the chain is further extended to encompass most of the root filesystem but it still does not cover container images.
- Full Chain of Trust (FCoT): in addition to the ECoT components, the container images are also validated.
Generally speaking, the hardening modifications to U-Boot included in the BCoT coverage level intend to:
- Prevent tampering of the running software (i.e. to U-Boot itself).
- Prevent execution of unsigned software.
- Prevent injection of kernel arguments.
For a detailed description of these modifications, refer to article Security Hardening of U-Boot.
Some hardware vendors and secure boot implementations only cover a limited version of the BCoT. One example is the UEFI Secure Boot by Microsoft.
Make sure to consider the practical differences when comparing the Toradex Secure Boot with other implementations.
Build Secure Boot Image
The base support for Secure Boot is included in the meta-toradex-security layer. At the moment, you must do a Yocto Project/OpenEmbedded build to generate a Torizon OS image with Secure Boot.
Setup Yocto Project
Set up your host PC for building Torizon OS from source as explained in the article Build Torizon OS from Source With Yocto Project/OpenEmbedded.
Install additional dependencies. The example is provided for Ubuntu 22.04 LTS, you may need to adapt the command depending on your Linux distro:
$ apt install python3-gi gir1.2-ostree-1.0
Add the following line to your conf/local.conf file:
INHERIT += "tdx-signed"
Configure FIT image signing as described on meta-toradex-security - Configuring FIT image signing.
Setup for NXP i.MX SoMs
Configure HAB/AHAB support as described on meta-toradex-security - Configuring HAB/AHAB support.
The above instructions point to the NXP Code-Signing Tool User’s Guide, also known as CSP UG. This document, as well as other tutorials on the web, don't provide information on what difference setting the CA flag has on the overall system security, as well as their pros and cons.
For SoMs with HABv4, the NXP AN4581 i.MX Secure Boot on HABv4 Supported Devices states that the CA flag being set is a recommended default:
Unless boot time is critical, it is recommended that the SRK have the CA flag, and the CSF and IMG keys used to validate their respective data. The fast authentication feature supplies the user with a faster boot time, at the cost of a less robust signature.
For SoMs with AHAB, the NXP AN12312 Secure Boot on i.MX 8 and i.MX 8X Families using AHAB doesn't provide information on whether the CA flag being set is a recommended default, it only states the following:
The container signature is verified against the SGK key certificate, which is then verified against the SRK table. If the subordinate key is not used, the container signature is directly verified against the SRK keys.
Advanced Setup Options
Refer to the meta-toradex-security README.
Build with the Yocto Project
Build the Torizon OS image as explained in the article Build Torizon OS from Source With Yocto Project/OpenEmbedded.
Install Secure Boot Image
Use Toradex Easy Installer to flash your unfused Toradex SoM.
By default, Easy Installer doesn't support burning the Efuses and thus closing the device out-of-the-box. It means that the installation of the secure boot image will succeed, but the boot ROM won't validate the bootloader yet, and thus it won't prevent images with the wrong signature from booting. Refer to the next section Fuse a Toradex SoM with Secure Boot Keys to learn more.
Close the Device - Fuse a Toradex SoM with Secure Boot Keys
These are one-time operations and cannot be undone:
- Once you burn Efuses with public key hashes, you will only be able to sign software with the same corresponding private keys.
- Once you burn the Efuse that closes the device, only signed software will run on it.
Easy Installer doesn't have support for burning Efuses out-of-the-box, and you must do it manually as described on meta-toradex-security - Configuring HAB/AHAB support - Closing the device.
Key Management
It is critical to manage signing keys with care. Losing or leaking keys may lead to compromising the system's security or preventing the system from being ever updated.
If you lose the private keys you have created to sign your images, you won't be able to install or update the software on devices that are closed.
Keep your keys in a safe and secure place, and consider having one or more backups in physically different locations.
Due to the first keys from the CoT being often stored in a place tightly coupled with the Boot ROM, every silicon vendor, and even every SoC for a given vendor, may have their own specification and peculiarities.
Key Management on NXP i.MX SoMs
In previous steps before the build, you had to perform a Setup for NXP i.MX SoMs, and in such case, you generated a PKI Tree, SRK Tables, and Efuse Hash. You must store those in a safe and secure place, otherwise, you won't be able to sign software with the corresponding keys and certificates that match the hashes used for verification on all SoMs closed with such corresponding Efuse Hashes.
In addition to it, for the NXP i.MX SoMs, you are entitled to burn 4 Efuse hashes on the SoC HAB/AHAB, thus you have effectively four valid signing keys to boot from. You can revoke them one by one, if and as needed, and still seamlessly boot from the other valid ones. You should consider keeping those in separate safe places so that in case a key gets compromised, you can use the others as backups.
Support Status and Limitations
Torizon OS support is limited to a partial implementation of the BCoT. The sub-section tables provide a granular description of supported and missing components and features.
Signed, Verified, and Hardened OS Components
| Toradex SoM | U-Boot (signing) | U-Boot (hardening) 1 | Kernel FIT image | Filesystem /usr | Filesystem /etc | Container images |
|---|---|---|---|---|---|---|
| Apalis iMX6 | yes | partial 6 | - | - | - | - |
| Apalis iMX8 | yes | yes | yes | - | - | - |
| Colibri iMX6 | yes | partial 6 | - | - | - | - |
| Colibri iMX6ULL | yes | yes | yes | - | - | - |
| Colibri iMX7 | yes | yes | yes | - | - | - |
| Colibri iMX8X | yes | yes | yes | - | - | - |
| Verdin AM62 | - | - | - | - | - | - |
| Verdin iMX8M Mini | yes | yes | yes | - | - | - |
| Verdin iMX8M Plus | yes | yes | yes | - | - | - |
Device Features
| Toradex SoM | Build an image | Sign an image | Install an image | Close the device |
|---|---|---|---|---|
| Apalis iMX6 | - | - | - | - |
| Apalis iMX8 | yes | yes | yes | yes 3 |
| Colibri iMX6 | - | - | - | - |
| Colibri iMX6ULL | yes | yes | yes | yes 3 |
| Colibri iMX7 | yes | yes | yes | yes 3 |
| Colibri iMX8X | yes | yes | yes | yes 3 |
| Verdin AM62 | - | - | - | - |
| Verdin iMX8M Mini | yes | yes | yes | yes 3 |
| Verdin iMX8M Plus | yes | yes | yes | yes 3 |
Device Update Capabilities
| Toradex SoM | OS updates | Application updates | Bootloader updates | Offline updates |
|---|---|---|---|---|
| Apalis iMX6 | - | - | - | - |
| Apalis iMX8 | yes | yes | yes 2 | yes |
| Colibri iMX6 | - | - | - | - |
| Colibri iMX6ULL | yes | yes | yes 2 | yes |
| Colibri iMX7 | yes | yes | yes 2 | yes |
| Colibri iMX8X | yes | yes | yes 2 | yes |
| Verdin AM62 | - | - | - | - |
| Verdin iMX8M Mini | yes | yes | yes 2 | yes |
| Verdin iMX8M Plus | yes | yes | yes 2 | yes |
Tools
| Toradex SoM | Yocto Project/OE | Toradex Easy Installer | TorizonCore Builder | Torizon Cloud 5 |
|---|---|---|---|---|
| Apalis iMX6 | - | - | - | - |
| Apalis iMX8 | yes | partial 3 4 | - | - |
| Colibri iMX6 | - | - | - | - |
| Colibri iMX6ULL | yes | partial 3 4 | - | - |
| Colibri iMX7 | yes | partial 3 4 | - | - |
| Colibri iMX8X | yes | partial 3 4 | - | - |
| Verdin AM62 | - | - | - | - |
| Verdin iMX8M Mini | yes | partial 3 4 | - | - |
| Verdin iMX8M Plus | yes | partial 3 4 | - | - |
Troubleshoot
This section has some common issues and their fixes.
/usr/bin/env: ‘python’: No such file or directory
When running repo init, you may see the following error:
/usr/bin/env: ‘python’: No such file or directory
This is because newer Linux distros don't provide python, only python3. On Ubuntu, you may work around this limitation by installing python-is-python3:
$ apt install python-is-python3
ModuleNotFoundError: No module named 'gi'
You may get an error during the do_image_ostreecommit task:
[...]
| Traceback (most recent call last):
|   File "/workdir/build-torizon/tmp/work/colibri_imx8x-tdx-linux/torizon-core-docker/1.0-r0/recipe-sysroot-native/usr/bin/ostree-convert-commit.py", line 22, in <module>
|     import gi
| ModuleNotFoundError: No module named 'gi'
[...]
ERROR: Task (/workdir/build-torizon/conf/../../layers/meta-toradex-torizon/recipes-images/images/torizon-core-docker.bb:do_image_ostreecommit) failed with exit code '1'
This error happens when you miss installing the package python3-gi as a build dependency.
ValueError: Namespace OSTree not available
You may get an error during the do_image_ostreecommit task:
[...]
ValueError: Namespace OSTree not available
[...]
ERROR: Task (/workdir/build-torizon/conf/../../layers/meta-toradex-torizon/recipes-images/images/torizon-core-docker.bb:do_image_ostreecommit) failed with exit code '1'
This error happens when you miss installing the package gir1.2-ostree-1.0 as a build dependency.
error: opening repo: opendir(objects): No such file or directory
You may get an error during the do_image_ostreecommit task:
ERROR: torizon-core-docker-1.0-r0 do_image_ostreecommit: ExecutionError('/workdir/build-torizon/tmp/work/colibri_imx8x-tdx-linux/torizon-core-docker/1.0-r0/temp/run.composefs_image_gen.301810', 1, None, None)
ERROR: Logfile of failure stored in: /workdir/build-torizon/tmp/work/colibri_imx8x-tdx-linux/torizon-core-docker/1.0-r0/temp/log.do_image_ostreecommit.301810
Log data follows:
[...]
| DEBUG: Executing shell function do_image_ostreecommit
| error: opening repo: opendir(objects): No such file or directory
| DEBUG: Shell function do_image_ostreecommit finished
[...]
| Traceback (most recent call last):
|   File "/workdir/build-torizon/tmp/work/colibri_imx8x-tdx-linux/torizon-core-docker/1.0-r0/recipe-sysroot-native/usr/bin/ostree-convert-commit.py", line 102, in <module>
|     entries = read_commit(repo, sys.argv[2])
|   File "/workdir/build-torizon/tmp/work/colibri_imx8x-tdx-linux/torizon-core-docker/1.0-r0/recipe-sysroot-native/usr/bin/ostree-convert-commit.py", line 96, in read_commit
|     return recurse_dir(repo, "", commit)
|   File "/workdir/build-torizon/tmp/work/colibri_imx8x-tdx-linux/torizon-core-docker/1.0-r0/recipe-sysroot-native/usr/bin/ostree-convert-commit.py", line 60, in recurse_dir
|     for k, v in f.get_xattrs()[1]:
| TypeError: OSTree.RepoFile.get_xattrs() takes exactly 3 arguments (1 given)
This error happens when you install a version of the package gir1.2-ostree-1.0 that is too old. As of July 2023, this is the case when building in a crops/poky container, which is based on Ubuntu 18.04 LTS.
Using a newer version of Ubuntu, crops/poky:ubuntu-22.04, or any OS with a more up-to-date version of gir1.2-ostree-1.0 will fix this issue.
Could not find CST binary
Make sure to download and configure the NXP CST tool, otherwise, you will see the following build error or similar:
ERROR: imx-boot-1.0-r0 do_compile: Could not find CST binary at /workdir/build-torizon/keys/cst/linux64/bin/cst
Could not find cert file SRK_1_2_3_4_table.bin
Make sure to generate all the keys and certificates, otherwise, you will see the following build error or similar. Such an error may also happen if you generate the file with a name different than the one expected, which is SRK_1_2_3_4_table.bin:
ERROR: imx-boot-1.0-r0 do_compile: Could not find cert file at /workdir/cst-3.3.2/crts/SRK_1_2_3_4_table.bin.
Could not find cert file SRK1_sha256_2048_65537_v3_usr_crt.pem
There is more than one reason for this error to happen.
- By default, the build expects the SRK certificates to be generated with the CA flag unset. If you set it, you may see the following error, in which case you can re-create the keys to fix it:
ERROR: imx-boot-1.0-r0 do_compile: Could not find cert file at /workdir/cst-3.3.2/crts/SRK1_sha256_2048_65537_v3_usr_crt.pem.
- The cert filename expected by OpenEmbedded is generated based on the configuration parameters TDX_IMX_HAB_CST_DIG_ALGO and TDX_IMX_HAB_CST_KEY_SIZE, described in the meta-toradex-security Readme. If you use different values when creating the certificates with the CST, the certificate file will not be found during the build.
Serial debug console hangs on "Starting version" during boot
The serial debug console seems to hang on the line Starting version <version number> during boot:
[    1.906201] debugfs: Directory 'mipi1-i2c0' with parent 'pm_genpd' already present!
[    1.913875] debugfs: Directory 'mipi1-pwm0' with parent 'pm_genpd' already present!
[    1.921557] debugfs: Directory 'mipi1' with parent 'pm_genpd' already present!
[    2.039331] imx6q-pcie 5f010000.pcie: PCIe PLL lock timeout
Starting version 250.5+
The boot time during the first boot can take much longer than on an image without Secure Boot. Just wait a couple of minutes and the login prompt will appear.
On the second boot onward, boot time will be faster.
The SoM doesn't boot and nothing shows up on the debug UART
This may happen if you use HABv4 keys to create the U-Boot binary for an AHAB SoM and vice-versa, for instance, by following the instructions in the wrong section of the NXP CST, or in case you are trying to use Secure Boot on different SoMs - one with HABv4 and another with AHAB - and you mistake the keys.
To fix it, create/use keys for the corresponding hardware.
The SoM uses a different bootloader than then one being installed
This scenario may have the same root cause as the SoM doesn't boot and nothing shows up on the debug UART, and thus it may happen if you use HABv4 keys to create the U-Boot binary for an AHAB SoM and vice-versa, for instance, by following the instructions in the wrong section of the NXP CST, or in case you are trying to use Secure Boot on different SoMs - one with HABv4 and another with AHAB - and you mistake the keys.
But (1) why would it boot a different bootloader, and (2) where does it come from?
(1) The eMMC standard specifies two bootloader partitions. On some SoCs, if booting from the active bootloader partition fails, it will automatically try the other one.
(2) If you ever performed a bootloader update prior to trying Secure Boot on a given SoM, the procedure will install the new bootloader on the second partition and make it the default, keeping the previous bootloader on the other partition.
To fix it, create/use keys for the corresponding hardware.
HAB warning on i.MX6 based modules
When running hab_status on i.MX6 based modules (Colibri i.MX6 & Apalis i.MX6), you may see a warning that looks similar to this:
Secure boot disabled

HAB Configuration: 0xf0, HAB State: 0x66

--------- HAB Event 1 -----------------
event data:
        0xdb 0x00 0x24 0x42 0x69 0x30 0xe1 0x1d
        0x00 0x04 0x00 0x02 0x40 0x00 0x36 0x06
        0x55 0x55 0x00 0x03 0x00 0x00 0x00 0x00
        0x00 0x00 0x00 0x00 0x00 0x00 0x00 0x00
        0x00 0x00 0x00 0x01

STS = HAB_WARNING (0x69)
RSN = HAB_ENG_FAIL (0x30)
CTX = HAB_CTX_ENTRY (0xE1)
ENG = HAB_ENG_CAAM (0x1D)
This is due to a defect on certain silicon revisions of the SoC itself. For more information regarding this defect please refer to the official NXP public report on the matter. Just to summarize the main points:
- This issue does not have any impact on the HAB/secure boot process.
- This issue does not compromise the security of the device.
- Devices showing this warning can still be safely closed via the corresponding Efuse.
- There is no way to remove this warning message, so it will have to be ignored.
- U-Boot is protected from executing unsafe commands and from loading unsigned FIT images. U-Boot environment variables protection is currently being implemented.↩
- U-Boot hardening is discussed in the introductory section Toradex Secure Boot Implementation. Read it to learn more.↩
- Easy Installer isn't capable of burning fuses without customization.↩
- Bootloader updates will require you to push a signed bootloader to the Torizon Cloud using TorizonCore Builder.↩
- Easy Installer doesn't support a signed bootloader, therefore, once fuses are burned, you cannot easily load it via recovery mode.↩
- There are currently no services in the Torizon Cloud related to Secure Boot, such as key management, among other possible services. Nonetheless, all existing services such as updates, device monitoring, among others are expected to work.↩