Detailed Manual
Introduction
The Toradex Easy Installer application runs completely in memory so that the complete internal flash can be erased, (re-)partitioned, formatted, or written to.
The image to be flashed can be obtained over the Internet (via Ethernet), from a USB Flash Drive or an SD card.
Security Statement
The Toradex Easy Installer allows for connecting to the module by, amongst other things, un-protected VNC as well as a serial console that provides root access without a password.
Please connect Toradex modules running the Toradex Easy Installer only to safe networks, especially during production.
Getting the Images
Toradex provides ready-made images which can be downloaded directly using Toradex Easy Installer's Internet capabilities or as zip/tar files that can be extracted to a USB Flash Drive/SD Card.
You can also install your own images as long as you package them in the Toradex Easy Installer format - see the Configuration Files tab for more information about it.
If you build an image with our Yocto based BSP you can find an image in the Toradex Easy Installer format under build/deploy/images/MACHINE/IMAGE-MACHINE-TIMESTAMP-Tezi_VERSION-DATE.tar.
You can untar this file to a USB stick and follow the section "From the Local Media".
From the Toradex Image Servers
The Toradex Easy Installer runs a DHCP client on the Ethernet port. As soon as the image gets an IP address assigned, the module will try to download a list of images from the Toradex image server (using HTTP).
In case this fails (e.g. due to missing DNS server or standard Gateway) an error will be shown.
Make sure that your DHCP provides a complete Network configuration that allows Internet access. To force a new DHCP request you can unplug and replug the Ethernet cable.
From the Local Media
The Toradex Easy Installer continuously monitors external devices.
As soon as the Kernel detects a new device, the installer will try to mount all partitions and scan for images. The images will be detected by the description JSON file named image.json (see Image Format below).
After scanning all directories the media will get unmounted so that users can safely unplugging the device after scanning. If the user unplugs the device, the images will disappear from the list of available images.
Since only metadata are read at this time, it is required to keep the media plugged in in case an image from that media shall be installed.
Supported file systems are ext2/3/4 and FAT.
- USB Flash Drives: USB Flash Drive (USB mass storage device class) devices connected to the USB Host or OTG port
- SD Card: SD cards plugged in any standard SD card port are supported.
The Links to download Toradex Easy installer images are available in the Load Toradex Easy Installer tab.
From a Local Web Server
You can set up any local web server in the same network as the computer on the module to provide images locally via the network.
There should be a JSON file named image_list.json that contains the path to all Toradex Easy installer images and their respective image.json files.
See our own server as an example:
You will also need to enable a custom feed using your IP address and path to the image_list.json file, as illustrated further down on feeds.
A comprehensive example useful during production is also provided below in the section Unattended Flashing Over Ethernet, where you can skip manually adding your custom server address.
From a Local Web Server Announced via Zeroconf
Starting with Tezi 2.0b4 the Toradex Easy Installer is able to use Zeroconf to find an image server feeds on the local network.
You need to set up a web server that self announces itself via Zeroconf. Combined with autoinstall this allows to automatically install images from a local server without any manual intervention.
To announce a Toradex Easy Installer image server add an AVAHI service to /etc/avahi/services with the following content:
<?xml version="1.0" standalone='no'?>

<!DOCTYPE service-group SYSTEM "avahi-service.dtd">
<service-group>
  <name replace-wildcards="yes">Custom Toradex Easy Installer Feed</name>
  <service>
    <type>_tezi._tcp</type>
    <port>80</port>
    <txt-record>name=Custom Toradex Easy Installer Feed</txt-record>
    <txt-record>path=/path/image_list.json</txt-record>
    <txt-record>enabled=1</txt-record>
    <txt-record>https=0</txt-record>
  </service>
</service-group>
When setting the parameter autoinstall: true in your image.json stored on the server, the image will automatically be installed.
All boards running the Toradex Easy Installer being connected to a network with a Zeroconf server and an image set up for autoinstall, will begin to install such an image automatically. You should avoid doing this during development if you share a network with colleagues that also might be booting their boards running the Toradex Easy Installer.
Usage
By default, the Toradex Easy Installer displays on VGA, parallel RGB, and HDMI/DVI-D (mirror mode) with a resolution of 640x480 (VGA display timings). HDMI hotplug is not supported, so you must connect cables before you power on the board.
Additionally, the GUI can be accessed via VNC, either over Ethernet (IP address depends on your DHCP server) or via USB Device virtual Ethernet Link (RNDIS) on IP 192.168.11.1.
The GUI can be controlled by any USB keyboard/mouse or via VNC.
If an unattended installation is required an auto-install mode is available too (see chapter Auto Installation).
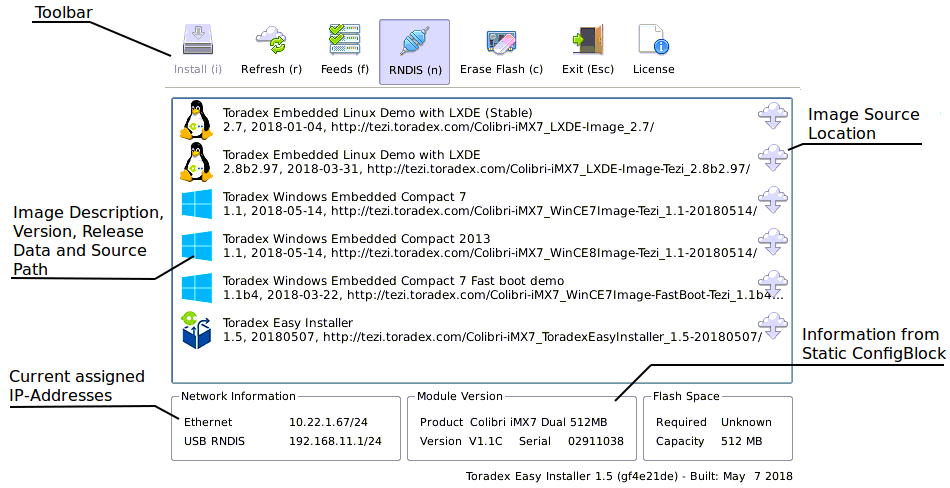
Install (i)
After selecting the image you wish to install, the "Install" button starts the installation.
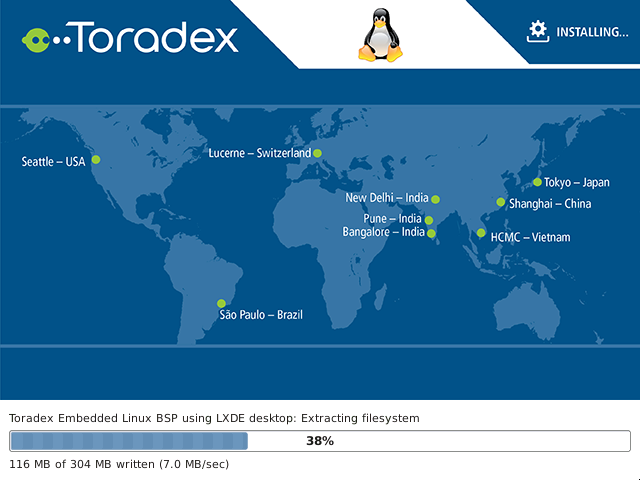
If the image is obtained through a network, some metadata will get downloaded first (such as Release Notes, License text, prepare and wrap-up scripts).
After accepting License and Release Notes, the block devices will be prepared (partitioned/formatted) as specified and the data to be written will be downloaded and unpacked in one step.
Since this step is done in one step (multiple commands connected through pipes) the image size can exceed the module's main memory capacity.
In case any step during Installation fails, an error message will be shown and the option to go back to the main menu will be shown. At this point, it is likely that the Toradex Easy Installer is no longer stored on the internal flash (e.g. due to repartitioning). Hence it is recommended to retry flashing the same image or install the Toradex Easy Installer so another retry can be made later.
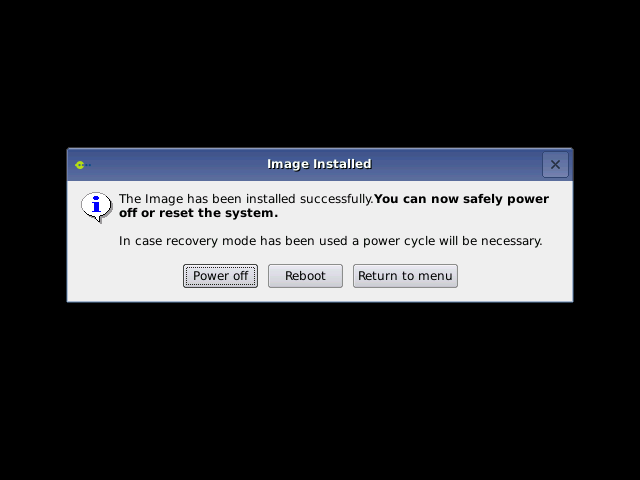
At this point, all data are stored on internal flash, and caches are flushed (synced).
It is not required to click on any of these three buttons, it is perfectly fine to just reset or turn off the system.
Refresh (r)
This button will reload the image list obtained over the network. It might be useful if you use custom feed servers that you frequently update or that you are using for testing purposes.
Feeds (f)
This button allows you to enable or add more sources for Toradex Easy Installer images in the form of feed servers.
On the standard image, it’s possible to enable Toradex's testing repositories.
You can also add your own feed server with your custom images by using the input form in the feeds window.
Click on the Feeds button, you can test by allowing the Toradex Continuous Integration Server (testing) for example.

Mass Storage (u)
This button allows exporting the internal flash as USB mass storage (eMMC based devices only).
This can be used after flashing an image to transfer additional files manually or examine the data written to internal flash.
Currently, this exports three disks: The eMMC main user partition (read/write) and the two eMMC boot partitions (read-only).
This is only available if RNDIS has been disabled.
RNDIS (n)
RNDIS provides a USB Device virtual Ethernet Link (RNDIS).
The USB RNDIS mode is enabled by default which allows users without a display to still use the Toradex Easy Installer.
The module will run a DHCP server on the link so that the host computer connected to the module will receive an IP address automatically.
The module has the IP on 192.168.11.1 assigned statically.
Depending on your Windows version it might be necessary to manually install the driver.
Via Device Manager, right-click and select "Update Driver...", choose the "Microsoft Corporation" "Remote NDIS Compatible Device" driver.
Erase Flash (c)
Erase flash erases all module's internal flash. The Toradex config block is automatically recreated after the operation.
For eMMC devices it uses blkdiscard and the eMMC controller is notified to discard data of all blocks, hence the complete device will appear as empty (all zeros).

For raw NAND devices, the whole flash is erased, including wear-leveling information.
Exit (Esc)
Reboots the module.
License
Shows the License information for the Qt-based UI.
Note that external utilities are part of the Toradex Easy Installer which are licensed under different Licenses.
Refer to the files stored under /usr/share/common-licenses/ and /usr/share/common-licenses/license.manifest for an overview.
Auto Installation
To automatically install an image, the image can be marked as "auto install" image using the autoinstall property in the image.json file.
When an image is marked with 'auto install,' it will be necessary to delete the license file in the image.json to bypass the acceptance check. This ensures that any license the image might have will be automatically accepted.
If that property is set to true the image will be flashed to the module automatically and unattended.
This can be useful for production programming.
Any image can carry the autoinstall property.
So, if multiple regular images have the property set to true the outcome will depend on the order of how images get processed.
There is no guaranteed order, so it is recommended to only use one local media with only one image having the autoinstall property set to true.
To allow automatically updating the Easy Installer, those images are treated somewhat differently:
- All Toradex Easy Installer images have the
isinstallerproperty set totrue. - If the
autoinstallproperty is set totruetoo, this image will be processed before any other images from the same media. - The Toradex Easy Installer will first check the image version against the version number of the running version.
- If the image is newer, the installer image will be installed first and the system automatically rebooted.
- Once the newer version of the Toradex Easy Installer is running, the version check will make sure that the installer image is not processed a second time.
- If there is a regular image with
autoinstallproperty set totrueavailable, this will be installed now.
This allows to automatically upgrade the Toradex Easy Installer before an image gets installed, which is useful when an image has a newer config format and hence requires a newer Toradex Easy Installer.
The Toradex Easy Installer does not automatically install a Toradex Easy Installer, if the version is older or equal.
To force automatic installation anyway, the following line needs to be modified in the image.json file:"isinstaller": false,.
Note that Reference Images for Yocto Project can no longer be installed unattended from BSP 5.2.0 on. For more information consult the ticket on the roadmap.
Auto Reboot
After flashing has finished, the same dialog as with regular flashing will be shown.
This is useful for the operator to know that the image has been successfully installed.
Note that although there are options to interact, there is no interaction needed: The operator can safely turn off the module at that point.
If an automatic reboot is required, the wrapup_script can be extended with the reboot command:
reboot -f
exit 0
Writing into a removable medium (SD/USB/SATA)
If your wrapup.sh script is located in a removable medium such as an SD card or a USB stick (as opposed to being retrieved from the network), such medium is mounted by default in read-only mode.
If you want to use the script to write into the medium, you should remount it first:
mount -o remount,rw /run/media/src

# Write operations here

exit 0
Note that if you want to write into the medium and plan to auto-reboot the system afterward by means of a reboot -f command, you should first unmount it to avoid data corruption. This is however problematic since the wrapup script is in the mounted partition already. Make sure you sync your data before reboot.
Upgrading Toradex Easy Installer
If an image is not compatible with the current running Toradex Easy Installer (the config_format is higher than the supported format), then the image won't be considered for automatic installation.
One can provide a new version of the Toradex Easy Installer alongside the autoinstall property set to true too.
If the currently running Toradex Easy Installers version is older than the provided installer (determined using the version and isinstaller property`), then the new Toradex Easy Installer will be installed first.
This behavior allows to automatically upgrade the Toradex Easy Installer before installing the final image. It is useful if a newer installer is required to install the image.
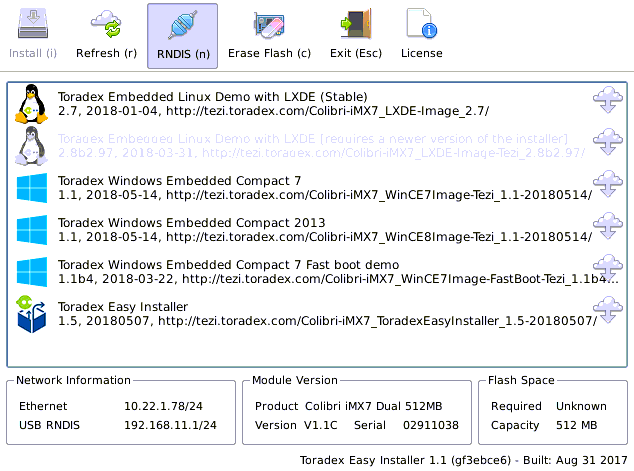
This screenshot shows this situation: The grayed-out image requires a newer Toradex Easy Installer.
Happily, there is a 1.5 version available. Both images can safely carry the autoinstall property since the Toradex Easy Installer only updates itself if the version is newer than the current version.
Speed improvements flashing Linux images
The main part of Linux images (the boots/rootfs files) is compressed using the LZMA2 algorithm (xz files).
The format offers relatively high decompression speed and high compression ratio.
However, if the image is read from a high bandwidth source the flashing process is limited by the decompression speed (CPU). The decompression utility xz does not offer multi-threaded decompression, hence it is limited to a single CPU.
On a Cortex A7@1GHz (Colibri iMX7) the average decompression speed has been measured to be around 8.4MB/s.
Using xz is a good compromise if the image is downloaded over the Internet or otherwise relatively slow connection. Local media such as SD cards or USB flash drive offer much higher bandwidth.
It is often faster to store the image uncompressed as a tar file in those cases.
Measurements have shown up to 3 times faster flash times (e.g. 7s instead of 21s to extract/write a 130MB root file system).
Currently, the OpenEmbedded image class does not offer to create uncompressed images.
To convert a regular image to an uncompressed image, simply decompress the *.rootfs.tar.xz and *.boots.tar.xz files using xz -d and make sure the filename properties in the images descriptor file image.json points to the unpacked *.tar files.
Further speed improvements might be obtainable by using pre-built file system images and the raw file writing capabilities of Toradex Easy Installer.
This method has not been evaluated by Toradex yet.
Unattended flashing over Ethernet
The Toradex Easy Installer can be used to flash images from an HTTP web server.
Using a configuration file as described in the Configuration Format chapter in the Configuration Files tab the Toradex Easy Installer can read the images from a custom/local URL.
Without a local media there is currently no way to provide the Installer with a custom URL. There exists a workaround documented further below.
Note that tdx-reference-images can no longer be installed unattended from BSP 5.2.0 on. For more information consult the ticket on the roadmap.
Example configuration
The requirements on the PC side are:
- Linux PC (e.g. Ubuntu)
- dnsmasq (for DNS approach below)
- nginx
- Host side IP address 192.168.10.1 (can be changed)
- Tested with Toradex Easy Installer 1.4 (earlier versions may work as well)
Make sure you have a nginx configuration that looks as follows:
server {
   listen 80 default_server;
   listen [::]:80 default_server;
   root /var/www/html;
   index index.html index.htm index.nginx-debian.html;
   server_name _;
   location / {
       try_files $uri $uri/ =404;
   }
}
Make sure that /etc/nginx/sites-enabled/default links to the file /etc/nginx/sites-available/default:
$ sudo ln -s /etc/nginx/sites-available/default /etc/nginx/sites-enabled/default
Now you can create an image list JSON file that looks as follows (example for Apalis TK1):
{
 "config_format": 1,
 "images": [
   "apalis_tk1/image.json"
 ]
}
Make a directory /var/www/html/apalis_tk1 to store your Tezi image along with all required files. Set the autoinstall flag to true:
{
   "autoinstall": true,
}
Make sure that you restart nginx:
$ sudo systemctl restart nginx
Once the Toradex Easy Installer boots it should automatically flash the image provided on your web server.
If you need log information, add them to prepare.sh and wrapup.sh.
You can, for example, use the nc command for sending log files over Ethernet.
Custom Image Server without Local Media
The Toradex Easy Installer always tries to load an image_list.json from the hard-coded URL https://tezi.toradex.com/image_list.json. Using a custom DNS server one can redirect tezi.toradex.com to a local production PC.
Redirecting DNS can be easily done using Dnsmasq.
This example shows how to use Dnsmasq as a DHCP and DNS server to serve the module an IP address and provides a custom DNS server pointing tezi.toradex.com to the production PC as well:
interface=<network interface>
dhcp-range=192.168.10.50,192.168.10.150,12h # Use different IPs if needed
address=/tezi.toradex.com/192.168.10.1 # Use IP address of your network interface
Make sure you restart Dnsmasq:
$ sudo systemctl restart dnsmasq
Make sure you set your host IP to 192.168.10.1 or to the IP you configured under address in dnsmasq.conf. Verify that no other DHCP or DNS server is running on your system or local network.
Once the Toradex Easy Installer boots it should connect using HTTP to the IP specified to download the image list and consequently install the image from the local webserver.
Remark about rootfs compression algorithm
Toradex Easy Installer images by default uses LZMA algorithm to compress the rootfs of the image (usually indicated by the .tar.xz extension).
If for some reason you need to use any other compression algorithm, keep in mind that the time needed during the flashing procedure can be greatly impacted due to the rootfs uncompressing step of the procedure.
Therefore we recommend that you test different compression algorithms and assess their impact on the flashing time.