How to setup Networking for Embedded Linux Application Development
This article helps setting up a dedicated networking environment for Embedded Linux application development.
Having two networks on your development workstation, one to connect to your company network or Internet and one dedicated to connect to your embedded target provides a predicable and stable networking environment for development. You can setup the network to have constant and stable IP addresses in the network towards your target even with several development workstations using the same corporate network. Optionally you can have a TFTP and NFS server on your workstation to implement TFTP/NFS boot as explained here. By isolating the two network you protect your embedded target from being flooded by random traffic and maybe attacks from a public network while on the other hand traffic generated by your device does not load or block your corporate network.
Hardware Requirements
- Developer Workstation with two Ethernet interfaces:
- Using a second physical Ethernet adapter (e.g. by using a USB to Ethernet adapter for notebooks)
- Alternatively reverting to a virtual Ethernet interface in conjunction with a managed switch configured for a separate target network VLAN
Network Setup
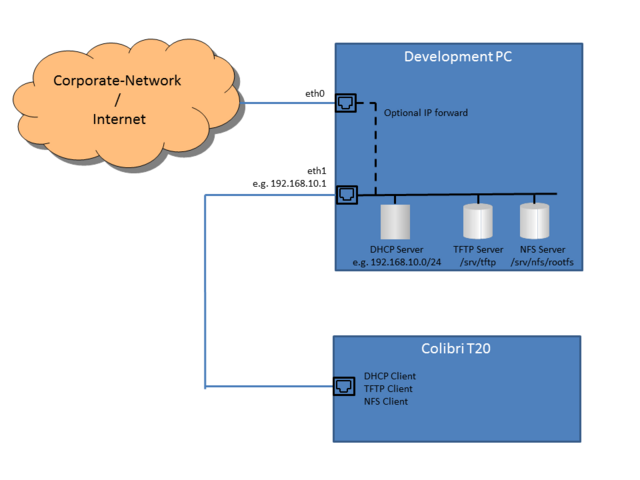
Install and configure the second network interface and give it a static IP address. In the example we will use the network address 192.168.10.0/24 with the workstation having the IP 192.168.10.1.
Install and configure a DHCP server and, depending on requirements, a TFTP and NFS server on your development workstation.
The instructions below have been tested with Ubuntu and Fedora, depending on the exact distribution version packages might be named differently, might need different configuration files or additional changes (such as firewall rules). If below documentation does not work as expected, please also consult your distributions documentation on what packages are needed and how they should be configured.
DHCP Server
Install and configure a DHCP server.
For Ubuntu install DHCP server with the following command:
$ sudo apt-get install isc-dhcp-server
More information about isc-dhcp-server can be found here.
For Fedora use the following command:
$ sudo dnf install dhcp
Edit the DHCP configuration file specifying IP addresses and Ethernet interface (check ip link for the available interfaces). Make sure to choose a network interface which is connected to the module only to avoid disturbing the company network with a rogue DHCP server.
$ sudo vi /etc/dhcp/dhcpd.conf
Sample DHCP Configuration
# dhcpd.conf

# option definitions common to all served networks...
option domain-name "colibri.net";
option domain-name-servers ns1.example.org;

default-lease-time 600;
max-lease-time 7200;

# Use this to enable / disable dynamic dns updates globally.
ddns-update-style none;

# Use this to send dhcp log messages to a different log file (you also
# have to hack syslog.conf to complete the redirection).
log-facility local7;

subnet 192.168.10.0 netmask 255.255.255.0 {
        default-lease-time              86400;
        max-lease-time                  86400;
        option broadcast-address        192.168.10.255;
        option domain-name              "colibri.net";
        option domain-name-servers      ns1.example.org;
        option ip-forwarding            off;
        option routers                  192.168.10.1;
        option subnet-mask              255.255.255.0;
        interface                       eth1;
        range                           192.168.10.32 192.168.10.254;
}
#MAC address dependent IP assignment, used for the toradex target device
host eval {
        filename                        "zImage";
        fixed-address                   192.168.10.2;
        hardware ethernet               00:14:2d:49:79:2c;
        next-server                     192.168.10.1;
        option host-name                "colibri";
        option root-path                "192.168.10.1:/srv/nfs/rootfs,wsize=1024,rsize=1024,v3";
}
Sample root-path for NFSv4
option root-path "rootfs,v4,tcp,clientaddr=0.0.0.0";
Note that ‘host eval’ field is used for NFS boot. More information here.
Start and Stop DHCP Service
For Ubuntu use:
$ sudo service isc-dhcp-server start
$ sudo service isc-dhcp-server stop
For Fedora use:
$ systemctl enable dhcpd.service
$ systemctl start dhcpd.service
$ systemctl stop dhcpd.service
After saving changes to file dhcpd.conf, restart the service.
Note: For NFSv4, rootfs as given above is relative to the root path which is where exports has the option "fsid=root" set (see below).
Take care to only answer DHCP requests originating from your development network card. You won't make friends by providing addresses to clients on your corporate network!
TFTP Server
To download files to the module, the Trivial File Transfer Protocol (TFTP) is used. U-Boot provides a TFTP Client, therefor the development host need to run a TFTP server.
Ubuntu
For Ubuntu, install TFTP Server with the following command:
$ sudo apt-get install tftpd-hpa
Configure the following file as neded:
$ sudo vi /etc/default/tftpd-hpa
Sample TFTP Configuration
# /etc/default/tftpd-hpa

TFTP_USERNAME="tftp"
TFTP_DIRECTORY="/srv/tftp"
TFTP_ADDRESS="[::]:69"
TFTP_OPTIONS="--secure"
Start and Stop TFTP Service
$ sudo service tftpd-hpa stop
$ sudo service tftpd-hpa start
To reload the configuration use:
$ sudo service tftpd-hpa force-reload
More information about TFTP installation on Ubuntu can be found here.
Create the directory /srv/tftp and change the group as follows:
$ sudo mkdir -p /srv/tftp/
$ sudo chown -R :nogroup /srv/tftp/
Fedora
To install TFTP Server on Fedora install the following packages:
$ sudo dnf install tftp-server tftp xinetd
Note: On latest Fedora releases the use of xinetd is discouraged and resp. configuration is located at /lib/systemd/system/tftp.service.
Then edit the configuration file:
$ sudo vi /etc/xinetd.d/tftp
Sample Fedora TFTP Configuration file
service tftp
{
        socket_type     = dgram
        protocol        = udp
        wait            = yes
        user            = root
        server          = /usr/sbin/in.tftpd
        server_args     = -c -s /srv/tftp
        disable         = no
        per_source      = 11
        cps             = 100 2
}
Start and Stop Services
systemctl enable xinetd.service
systemctl start xinetd.service
systemctl stop xinetd.service
systemctl enable tftp.socket
systemctl start tftp.socket
systemctl stop tftp.socket
systemctl enable tftp.service
systemctl start tftp.service
systemctl stop tftp.service
Create the directory /srv/tftp and change the group as follows:
$ sudo mkdir -p /srv/tftp/
$ sudo chown -R nobody:nobody /srv/tftp/
NFS Server Configuration
For Ubuntu, install nfs server with the command:
$ sudo apt-get install nfs-kernel-server
NFSv3 Configuration
Create an export configuration:
#/etc/exports
/srv/nfs/rootfs 192.168.10.2(no_root_squash,no_subtree_check,rw)
NFSv4 Configuration
Remember to update the option root-path in your DHCP configuration as well.
Create an export configuration:
#/etc/exports
/srv/nfs 192.168.10.1/24(no_root_squash,no_subtree_check,rw,fsid=root)
Apply Configuration
Start/restart the relevant daemons.
E.g. on Ubuntu:
$ sudo service nfs-kernel-server restart
E.g. on Fedora:
$ sudo systemctl restart nfs-server.service
More information on NFS configuration for Ubuntu can be found here.
Routing: Connect the Developer Network to the Internet
If you want to connect your developer network to the Internet do the following steps on your development workstation:
Enable IP forwarding
sudo sysctl -w net.ipv4.ip_forward=1
or
sudo bash -c "echo 1 > /proc/sys/net/ipv4/ip_forward"
Create new iptables Rule
sudo iptables -t nat -A POSTROUTING -o eth0 -j MASQUERADE
or
sudo iptables -t nat -A POSTROUTING -o eth0 -j SNAT --to-source 192.168.1.56
NOTE: eth0 is connected towards the Internet and 192.168.1.56 is the IP address of that interface. NOTE: Search for the keywords NAT and masquerade in your distributions documentation for distro specific information.