Using Multiple Containers with Torizon OS
Introduction
A strong advantage of the Torizon Cloud is the possibility to work with microservices architecture. This software development technique provides great advantages such as modularity, scalability, integration, and distributed development. Torizon OS is the base operating system in which Torizon is built and provides Docker for microservices implementation using containers.
In this article, you will learn how to orchestrate multiple containers, for example, the ones from the List of Container Images for Torizon, and manage the inter-communication process from a sample implementation using Grafana, Collectd, and InfluxDB.
This article complies with the Typographic Conventions for Torizon Documentation.
Working with Multiple Containers
Docker Compose
Compose is a tool for defining and running multi-container Docker applications. Compose uses a YAML (*.yml) file to configure the application’s services. With the Compose file, in a single command, you create and start all the services from your configuration. There are some advantages to create a docker-compose (.yml) to orchestrate the execution of your containers. These include:
- With a docker-compose file you can have all the parameters to launch a single or multiple containers saved on a file.
- You can provision a device (or a fleet of devices) in Torizon Cloud and update its containers remotely over-the-air just by sending the YAML to the web application.
- A developer can pre-provision containers with a Torizon OS image, and have a single image to flash on production.
Communication Inter Containers
When executing a system with multiple containers, some methods can be applied for communication and message passing between containers. Some of these methods are files/directories sharing and IP sockets. In this example, we will show communication through IP sockets (The communication will be done through HTTP requests).
By default, Docker Compose sets up a single network for your app. Each container for a service joins the default network and is both reachable by other containers on that network, and discoverable by them at a hostname identical to the container name. For more information, please, refer to Networking in Compose page.
Startup Order and Synchronization
Often, some applications inside containers depend on or communicate with applications inside other containers. This may be a problem on scenarios where an application has no knowledge of whether its dependencies are available.
It is possible to use a few techniques to set the container startup order and synchronization:
- Make sure the problem is related to container startup. If not, leave things as-is.
- One way to validate it: add a big sleep statement to the container you think is crashing or not working properly.
- If you own the affected app, modify it so that it waits for dependencies to become available instead of crashing.
- If you don’t control the app, or don’t want to modify things at the app level, use the Docker Compose depends_on and healthcheck options combined to guarantee a given container only starts after another one is working as expected.
Example: Multi-Container Application with Grafana, Collectd, and InfluxDB
In this example, we will show a multi-container application that displays the performance data of a Toradex's Computer-on-Module (CoM) using the following open-source software: Grafana, Collectd, and InfluxDB.
Briefing
Grafana is a data query and presenting tool, which lets us build a graph chart based on InfluxDB. InfluxDB is our time-series database. Grafana sends a query to InfluxDB (port 8086) by an HTTP request.
Collectd is a Unix daemon that collects, transfers, and stores performance data of computers and network equipment and sends it to InfluxDB.
In summary, Collectd will produce data and store it in the database (controlled by InfluxDB). Grafana will consume the data in the database and display it. In this example, we want to have 1 Docker container for each of the components - Grafana, Collectd, and InfluxDB. Hence, the core of our application contains 3 containers and the main YAML (.yml) file.
It is possible to show Grafana on local video output, in addition to having it served over a network interface. To make this possible, we bring-up a Weston container and a Chromium container in kiosk mode. This is an optional part of the demo that uses 2 extra containers and an extra YAML (.yml) file. You can easily remove it if you want.

Instructions
First, obtain the files of this example. To do that, clone the repository to your PC:
$ git clone https://github.com/toradex/torizon-samples
Copy grafana directory from your PC to your module using scp (replace X.X.X.X by your module’s IP-address):
$ scp -r ./torizon-samples/grafana/ torizon@X.X.X.X:/home/torizon/
Connect to your module's shell by using SSH:
$ torizon@X.X.X.X
In your module's terminal, change the current directory to the "grafana" directory:
# cd /home/torizon/grafana
The muti-container orchestration and configuration for this example are provided in:
- The docker-compose.yml for InfluxDB, Grafana and Collectd
- The Docker Compose override files for Weston and Chromium: docker-compose.override.armhf.yml and docker-compose.override.arm64.yml.
- Do not copy these files as
docker-compose.override.ymlin the next step, if you don't want to show Grafana on a local display.
- Do not copy these files as
You are advised to consult the Compose file reference and the article Share Compose configurations between files and projects when customizing the example or writing your own.
If you want to show Grafana on a local display, copy either docker-compose.override.armhf.yml for 32-bit targets or docker-compose.override.arm64.yml for 64-bit targets, as docker-compose.override.yml.
cp docker-compose.override.arm64.yml docker-compose.override.yml
cp docker-compose.override.armhf.yml docker-compose.override.yml
To execute the application defined by the YAML file, execute the following command. Compose automatically uses the files named docker-compose.yml and docker-compose.override.yml if no other files are specified with the -f option:
The option -d or --detach runs the containers in the background in detached mode.
# docker-compose up -d
Release Versions
Often during development, the tag latest is used for bringing up containers or basing Dockerfiles (FROM <image>:<release version>). That is OK but often one wants to set a specific version to prevent things to break due to an updated that has not yet been validated, for instance.
This demonstration uses specific versions for Grafana (grafana:<release version>) and InfluxDB (influxdb:<release version>). consult the docker-compose.yml to see what are the latest versions being used by the current example.
Example Explained
Key snippets from the docker-compose.yml are explained below:
Key snippets from the docker-compose.override.arm64.yml are explained below:
Key snippets from the docker-compose.override.armhf.yml are explained below:
To know more about the device_cgroup_rules section of the docker compose file above, please refer to the Hardware Access through Control Group Rules (cgroup) section of the Torizon Best Practices Guide article
How to Use the Example - Configure Grafana
Open a browser on your computer, on the same network as the board, and access the board IP address on port 3000 http://X.X.X.X:3000/ and log in with default (user: admin, password: admin).
If you are using the optional local ui the Grafana login page will open automatically on a screen attached on the device board.
Click Add data source:
select InfluxDB as a data source type
set URL to http://influxdb:8086 (we use docker link, so we can access it by container name)
write the name of your database (“collectd“ in our case)
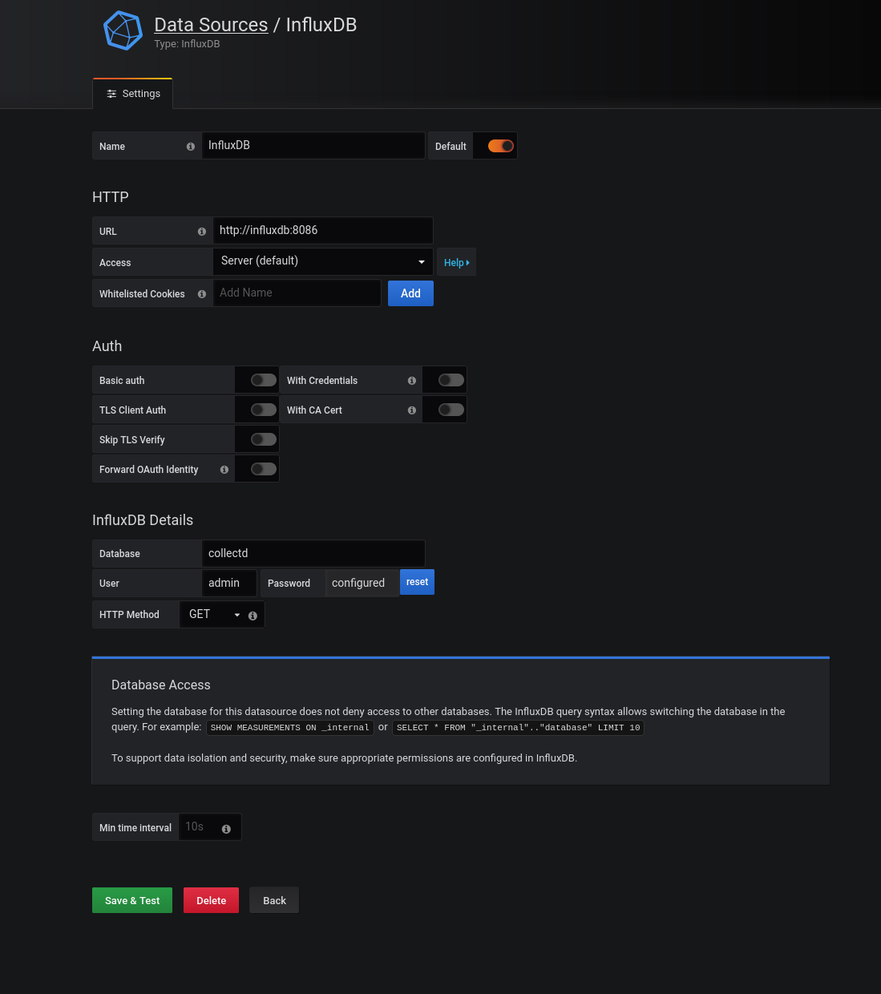
- Click Save & Test button, it should say "Data source is working."
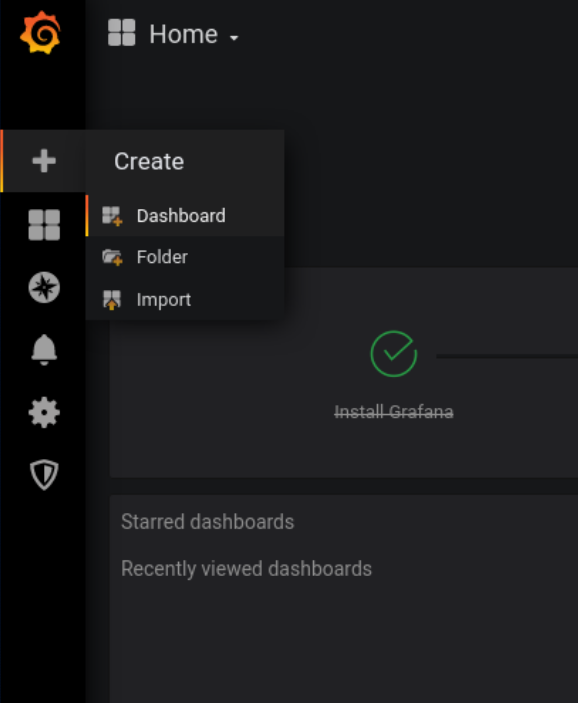
Create a new Dashboard:
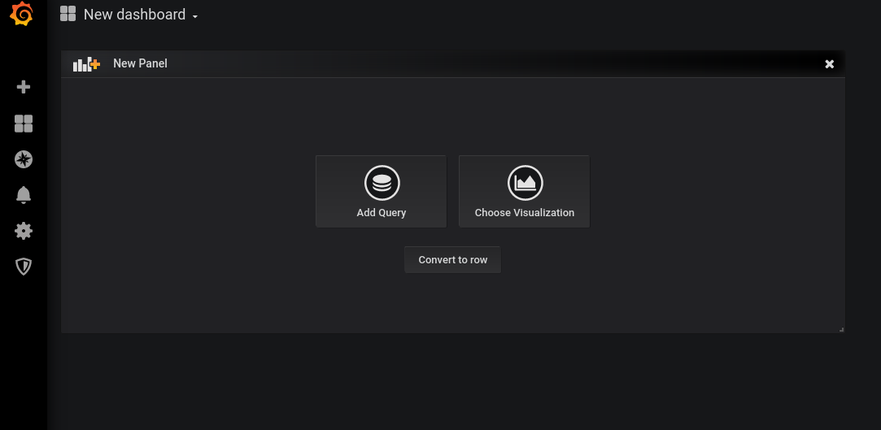
- Select Choose Visualization:
- Choose InfluxDB as a query:
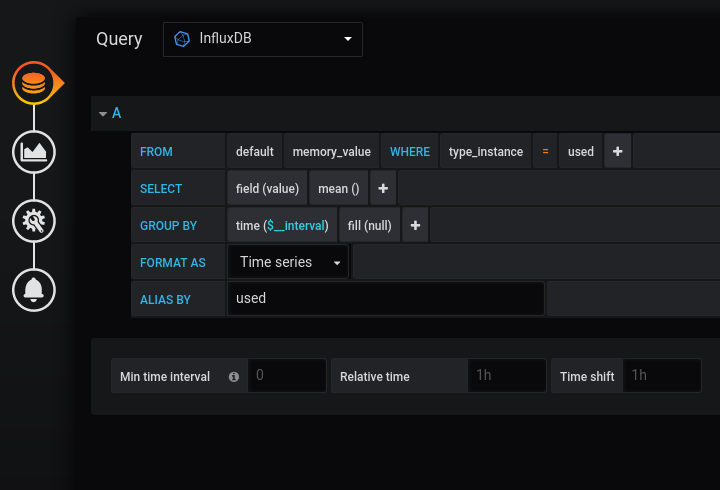
- Customize the panel the way you prefer.
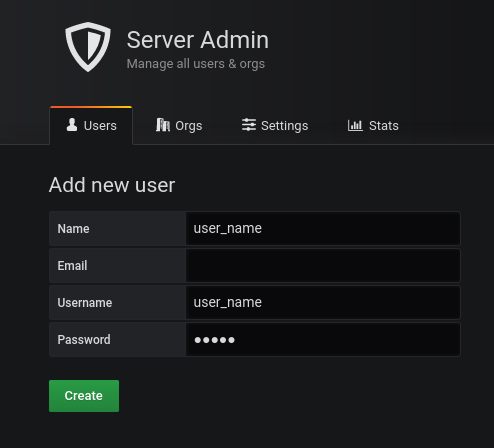
How to Create User with Read-Only Permission
- Click Server Admin > Users > New user