Store and Share Container Images
Introduction
This article presents relevant concepts for managing container images. The following topics are covered:
- Docker save and load: Saving and loading container images as tar files.
- Online and local container registries: Storing and sharing container images.
- Pull-through cache: Overcoming network issues when downloading container images using local caches.
This article complies with the Typographic Conventions for Toradex Documentation.
Low-Bandwidth Connection
Container download during Remote updates with Torizon Cloud can be affected by low-bandwidth connection or network instability, leading to timeouts and download errors.
To avoid those problems, either use pull-through cache or customize Aktualizr configuration.
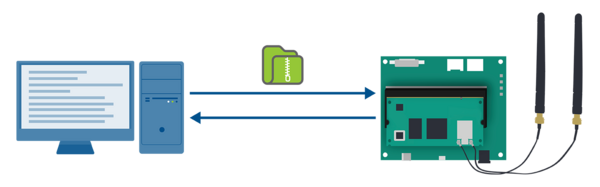
Docker Save and Load
With the docker load and docker save commands, you can handle docker images as portable tar archive files.
-
To save a container image as a tar file, run the following command:
$ docker save -o my-dockerfile.tar <username>/my-dockerfile -
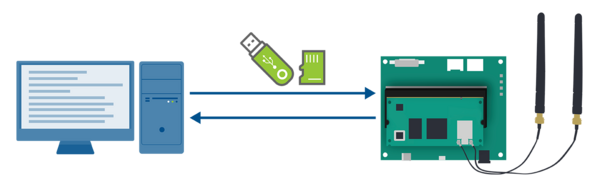
Copy the file to your target device. You can transfer the image via external media or use the
scpcommand as follows:$ scp my-dockerfile.tar torizon@X.X.X.X:/home/torizon/tipYou can compress container images to speed up their transfer to your target device.
-
To load the container image from the tar file, use the command below:
# docker load -i my-dockerfile.tar
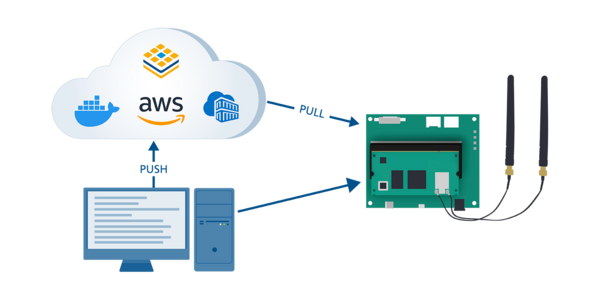
Container Registry
A container registry is a service that stores and shares container images. It can be hosted by cloud platforms - like Docker Hub or AWS - or deployed locally. Developers also use container registries to manage versioning and automate deployment to production environments.
Online Registry
When storing images online, note that cloud platform plans differ in terms of storage and image throughput. Also, on free plans, registries are usually public, while private registries are available on paid plans. Ensure you meet the security and intellectual property requirements of your project before pushing images to any cloud platform.
Public Registry
By default, Docker commands interact with Docker Hub, the container registry provided by Docker. Note that free accounts can only have public repositories, meaning anyone on the web will be able to access them.
To use Docker Hub to store your repository, use the following command to log in to your account:
$ docker login
username refers to your Docker Hub username, which is also your namespace inside the Docker Hub. my-container-image refers to the container image's name you are pushing or pulling.
-
To download an image, use the
pullcommand.$ docker pull <username>/<my-container-image> -
To upload a container image use the
pushcommand.$ docker push <username>/<my-container-image>
Private Registry
Several cloud platforms provide private registries for storing containers. Using them instead of Docker Hub requires additional configuration. Please visit our dedicated article about private registries for detailed instructions:
Torizon Cloud
Torizon Cloud is not a container registry. Torizon Cloud provides a secure, fast and efficient way to deploy applications to fleets using Docker Compose files for container orchestration. It works in conjunction with the container registry approach you choose.

For more information, see Devices Fleet Management.
To integrate a private container registry with Torizon Cloud, see Using Private Registries With Torizon Cloud.
Local Registry
Local registries are used in different situations, for example:
- Security and intellectual property requirements: It is a way of having controlled environmets without relying on cloud platforms.
- Internet connection: It allows sharing containers in environments with limited or no internet connection.
By default, Docker considers local registries insecure and does not allow pushes to them. To use local registries securely, you must set them up to use TLS for communication. For testing purposes, you can configure the Docker daemon to allow communication with a specific insecure registry. For more information, see Dockerd Insecure Registries.
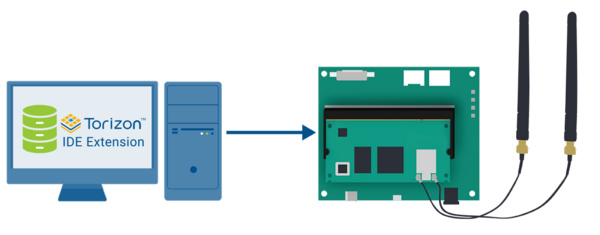
By default, the Torizon IDE Extension stores container images in local registries without additional setup.
The Distribution Registry provides complete documentation for setting up and managing local container registries. While it can get fancy, a single command on your development PC is all you need to get the basics running:
$ docker run -d -p 5000:5000 --name registry registry:2
With the registry running, proceed with the following steps to store and share container images.
-
Build container images pointing to the local registry or create additional tags for existing images. Both options are described as follows:
-
Build a container pointing to a local registry.
$ docker build -t localhost:5000/<my-container-image>:<tag> . -
Tag an existing image, pointing to the local registry:
$ docker tag <my-container-image>:<tag> localhost:5000/<my-container-image>:<tag>
For more information, see the docker build and docker tag documentation.
-
-
To push images, prefix the image name with your local registry:
$ docker push localhost:5000/<my-container-image> -
To pull images, remember to also point to your local registry:
$ docker pull localhost:5000/<my-container-image>:<tag>
If you are having trouble, consult the Docker documentation:
Pull-through Cache
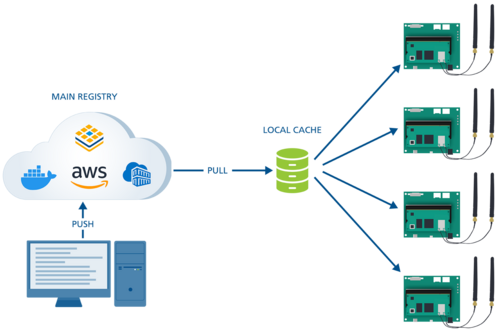
If you have multiple devices running Docker and want to update a container image, each one needs to access the internet and fetch the new image from Docker Hub. To avoid issues related to internet traffic, it is possible to create centralized local caches that mirror repositories of Docker Hub. By modifying the /etc/docker/daemon.json file on your device, you can configure Docker to pull all images through your cache. The first time an image is requested, the caching registry will fetch it from the upstream, store it locally, and then deliver it to the client. Any subsequent requests for the same image from any device will be served from that cache. For detailed information on disk space requirements and cache expiration policies, see Registry as a pull-through cache.
To run your local registry as a pull-through cache, modify the registry config file and share it as a volume into the running registry container. A usable config.yml is:
version: 0.1
log:
  fields:
    service: registry
storage:
  cache:
    blobdescriptor: inmemory
  filesystem:
    rootdirectory: /var/lib/registry
proxy:
  remoteurl: https://registry-1.docker.io
http:
  addr: :5000
  headers:
    X-Content-Type-Options: [nosniff]
health:
  storagedriver:
    enabled: true
    interval: 10s
    threshold: 3
With the important lines being:
proxy:
  remoteurl: https://registry-1.docker.io
The remoteurl property configures the cache to pull images from Docker Hub.
To run the registry cache, the following docker-compose file can be used:
version: "3"
services:
  docker-registry:
    container_name: docker-registry
    image: registry.hub.docker.com/library/registry:2
    ports:
      - 5000:5000/tcp
    volumes:
      - ./config.yml:/etc/docker/registry/config.yml
      - ${HOME}/registry:/var/lib/registry
    restart: unless-stopped
The preceding compose file will run the registry with the custom config.yml file. It will also store the registry file contents in the local filesystem in ${HOME}/registry, allowing the cache contents to persist across container restarts.
To instruct your devices to use the created cache, modify or create /etc/docker/daemon.json with the following content:
{
  "registry-mirrors" : ["<host-machine-ip>:5000"]
}