Signing and Pushing Torizon OS and Application Packages to Torizon Cloud
Introduction
The Torizon Cloud allows customers to push their own customized versions of Torizon OS (OS updates) and Docker Compose (application updates) to our hosted service. It means that, after customizing an image or creating your application, you must sign and push it to Torizon Cloud.
In this article, you will learn how to use the TorizonCore Builder Tool for signing and pushing packages to the Torizon Cloud.
This article complies with the Typographic Conventions for Torizon Documentation.
Prerequisites
The prerequisites to complete these instructions are:
- A host machine with TorizonCore Builder installed.
- A
.tarfile containing the Torizon OS Image with no-container pre-provisioned for offline installation. - A
credentials.zipfile downloaded from your account on the Torizon Cloud dashboard. - A docker-compose file of your appplication container if you want to update your application.
- A generic package file of your custom subsystem update if you want update your custom subsystem module.
Make sure your working directory has the following structure, including credentials.zip, docker-compose.yml, generic-package.bin and the Torizon OS installation image torizoncore-image-tezi-format:
$ tree
.
├── credentials.zip
├── torizoncore-image-tezi-format.tar
├── docker-compose.yml
└── generic-package.bin
Also make sure you can run TorizonCore Builder:
$ torizoncore-builder --help
Generating a Torizon OS image
Our TorizonCore Builder tool is the recommended way to customize a Torizon OS image to suit your product requirements. This tool allows easy customization of nearly all aspects of the OS, and for a more detailed evaluation at its features please take a look at TorizonCore Builder Tool - Customizing Torizon OS Images.
With TorizonCore Builder, you will always generate OS images that are suitable to be pushed to our Torizon Cloud for updates.
The output of this process is either an OSTree reference or a Toradex Easy Installer compatible image - ready to be installed with Toradex Easy Installer (TEZI), usually during production programming.
- Using standalone commands:
the
deploy commandgenerates a TEZI format image, while theunion commandgenerates an OStree branch. - Using the
build command, you can set theoutput sectionof the configuration file for either options.
If you want to deploy simultaneously the OS and application with Torizon Cloud, you should use the synchronous update feature of our Torizon Cloud, instead of customizing your image to bundle containers to a Torizon OS image, since its bundled containers are not capable of being deployed without Toradex Easy Installer.
Signing and Pushing the Image to Torizon Cloud
The TorizonCore Builder tool will also be used to push your OS image and your application to the server.
The command platform push from TorizonCore Builder can be used to push a new Torizon OS image to Torizon Cloud.
torizoncore-builder platform push --credentials <credentials file> <ostree reference>
The command requires the credentials.zip file from Torizon Cloud and a reference to the OSTree repository that should be pushed to the Platform Services server.
If you are pushing Toradex Easy Installer compatible images, first you should run the images unpack command
to generate a base OStree reference.
$ torizoncore-builder images unpack <base Toradex Easy Installer image of Torizon>
After running the images unpack command, you should use base as the ostree reference.
As an example, the command below will push the customized and unpacked image to Torizon Cloud:
torizoncore-builder platform push --credentials credentials.zip base
Now, if you log in to Torizon Cloud and initiate an update, you should see the customized image, ready to be used to update a device:

And, if everything went fine with the update, you shall see your board rebooting when the process is completed, and the splash screen shown in the device initialization will be the one defined in the new image.
There are also some additional arguments that can be passed to further customize this image update package.
torizoncore-builder platform push --credentials <credentials file> --package-name <name for this image update> --package-version <version for this image update> <ostree reference> --hardwareid <supported hardware for this image update>
The --package-name argument will apply whatever is passed as the name for this image update package. Simply put, this is the name that your update will appear under in our Torizon Cloud web UI. However, this argument is optional and, if not used, will default to the OSTree reference.
The --package-version argument is the version that this image update package will show up as in the web UI. This doesn't have to be a numerical version and can be any legitimate string. This argument is optional, and if not used, the version will default to the OSTree subject.
The --hardwareid argument defines which hardware IDs the image to be uploaded will be compatible with. This argument can be repeated multiple times, adding extra supported hardware IDs to the image. It's important to notice this argument will override the default image's hardware ID. Under the Supported Hardware tab at the Torizon Cloud web UI, you can confirm the changes. This argument is optional, and if not used, the supported hardware ID will default to the original image's hardware ID.
Also, check the using a static-delta section. Using this approach makes updating an existing package, on the deployed device, more efficient.
Signing and pushing the docker-compose file to Torizon Cloud
You can easily create application packages using the Torizon IDE Extension. For more information, see Build, Test and Push Applications for Production.
The command platform push can also be used to push docker-compose files to Torizon Cloud.
For this credentials.zip is also required along with the path to the docker-compose file. Your compose file can have any name, as long as it ends in .yml, or .yaml. If it does not have either of these file endings then the command will assume you passed an OSTree reference instead.
torizoncore-builder platform push --credentials <credentials file> <path to docker-compose file>
There are also some additional arguments that can be passed to further customize this update package
torizoncore-builder platform push --credentials <credentials file> --package-name <name for this update> --package-version <version for this update> --canonicalize <path to docker-compose file>
The --package-name argument will apply whatever is passed as the name for this updated package. Simply put, this is the name that your update will appear under in our Torizon Cloud web UI. However, this argument is optional and, if not used, will default to the pushed file's name.
The --package-version argument is the version that this package will show up as in the web UI. This doesn't have to be a numerical version and can be any legitimate string. This argument is also optional and, if not used, will default to the date of upload at UTC time in the format of yyyy-mm-dd.
The --canonicalize argument generates a canonicalized version of the docker-compose file, changing its extension to '.lock.yml' or '.lock.yaml' before pushing it to Torizon Cloud. If no other package name is provided, using the --package-name argument, the default package name will be the generated file's name when using the canonicalize argument.
For a docker-compose file to be suitable for use with offline updates it must be in canonical form.
Moreover, due to some known limitations, the package name must only employ basic ASCII characters excluding control ones and those in the set \/:*?"><|, otherwise the Lockbox generation may fail later.
For example running the following command:
torizoncore-builder platform push --credentials credentials.zip --package-name tcb-test --package-version 1.1 docker-compose.yml
Will result in the following appearing in your account's web UI:

Signing and pushing generic package file to Torizon Cloud
The command platform push can also be used to push generic package files to Torizon Cloud.
For this credentials.zip and hardwareid is also required along with the path to the generic package file. Your generic package file can have any name, but it should not end with .yml, or .yaml. If it haves either of these file endings then the command will assume you passed a docker-compose file instead.
torizoncore-builder platform push --credentials <credentials file> --hardwareid <my generic package hardwareid> <path to generic package file>
There are also some additional arguments that can be passed to further customize this update package
torizoncore-builder platform push --credentials <credentials file> --hardwareid <my generic package hardwareid> --custom-meta <custom metadata> --package-name <name for this update> --package-version <version for this update>
The --package-name argument will apply whatever is passed as the name for this updated package. Simply put, this is the name that your update will appear under in our Torizon Cloud web UI. However, this argument is optional and, if not used, will default to the pushed file's name.
The --package-version argument is the version that this package will show up as in the web UI. This doesn't have to be a numerical version and can be any legitimate string. This argument is also optional and, if not used, will default to the date of upload at UTC time in the format of yyyy-mm-dd.
The --custom-meta argument allow you to add some custom metadata to the generic package do be used on the device during the installation phase. The format of the custom metadata must be JSON.
For example running the following command:
torizoncore-builder platform push --credentials credentials.zip --hardwareid genpack --package-name tcb-test-genpack --custom-meta '{"fw_ver": "000007"}' --package-version 1.1 generic-package.bin
Will result in the following appearing in your account's web UI:

Lockfiles and Canonical Docker Compose Files
The platform push command with the --canonicalize-only option will generate a canonical copy of the used docker-compose file, but not push it to the platform.
torizoncore-builder platform push --canonicalize-only <docker-compose file>
Canonicalizing a docker-compose file basically means putting it into a specific YAML format, removing comments (lines starting with a # or any word included after a # character), and associating HASH values to Docker images.
The canonical docker-compose file makes it easier to track changes to this docker-compose file and also make your deployment more secure since we are pulling down images based on HASHES instead of tags.
When pushing a docker-compose file to Torizon Cloud, using the --canonicalize option, TorizonCore Builder will:
- Canonicalize the docker-compose file.
- Save a copy of the canonicalized docker-compose file with
.lock.ymlor.lock.yamlextension (depending on how you named your docker-compose file). - Send the canonicalized docker-compose file to Torizon Cloud.
Setting Package Compatibility on Application Packages
Setting package compatibilities can be done on application packages within the Torizon Cloud system. Doing this will specify a set of OS package versions, identified by their unique hash value, that the application should be installed into. This can be useful when, as an example, your application depends on a specific kernel version. This could be due to driver functionality that only exists in the newer kernel or any other features. Adding this compatibility setting into the package will allow the Torizon platform to warn operators when they are deploying applications to a version of the OS that may not work.
The OS package Hash can be found by inspecting the OS package on your Platform account. The OS package must be accessible on your Platform account.
Defining compatibilities can be done both through the Torizon web UI and using the command line tooling.
Setting Package Compatibility from the command line
When pushing a docker-compose file to Torizon Cloud, you can set the package compatibility using the --compatible-with argument. This argument accepts the OS package hash and restricts an application package so it can only be installed with a compatible OS package.
torizoncore-builder platform push --compatible-with sha256=<OS package hash> --credentials <credentials file> <path to docker-compose file>
Setting Package Compatibility from the Web interface
Once the Docker Compose file is added to your Platform account, you can inspect its compatibilities in the compatibilities section when clicking on the Docker Compose Package.
To edit the Package compatibility on a Docker Compose file in the platform, use the Configure Compatibilities section:

Creating and Deploying a Static Delta OS Image Update
Static delta generation pre-computes a binary diff between two specific OS packages, making that particular upload path more efficient.
As an example, you pushed a customized image to Torizon Cloud:
$ torizoncore-builder platform push --credentials credentials.zip base
And deployed the image to the modules on the field.
Later on, you updated that image to a newer version and pushed the updated version to Torizon Cloud:
$ torizoncore-builder platform push --credentials credentials.zip --package-version newer base
From this point, you have 2 options:
- Initiate the update on the module;
- This will require the module to download all new and changed objects before updating.
- Create a static-delta and update the module with the delta;
- This way, the module downloads only difference between the versions in the changed files.
To create a static-delta and push it to Torizon Cloud, you need the hashes of the old version and the new version.
The OS package Hash can be found by inspecting the OS package on your Torizon Cloud Platform account. The OS package must be accessible on your Platform account.
$ torizoncore-builder platform static-delta create --credentials credentials.zip <FROM_HASH> <TO_HASH>
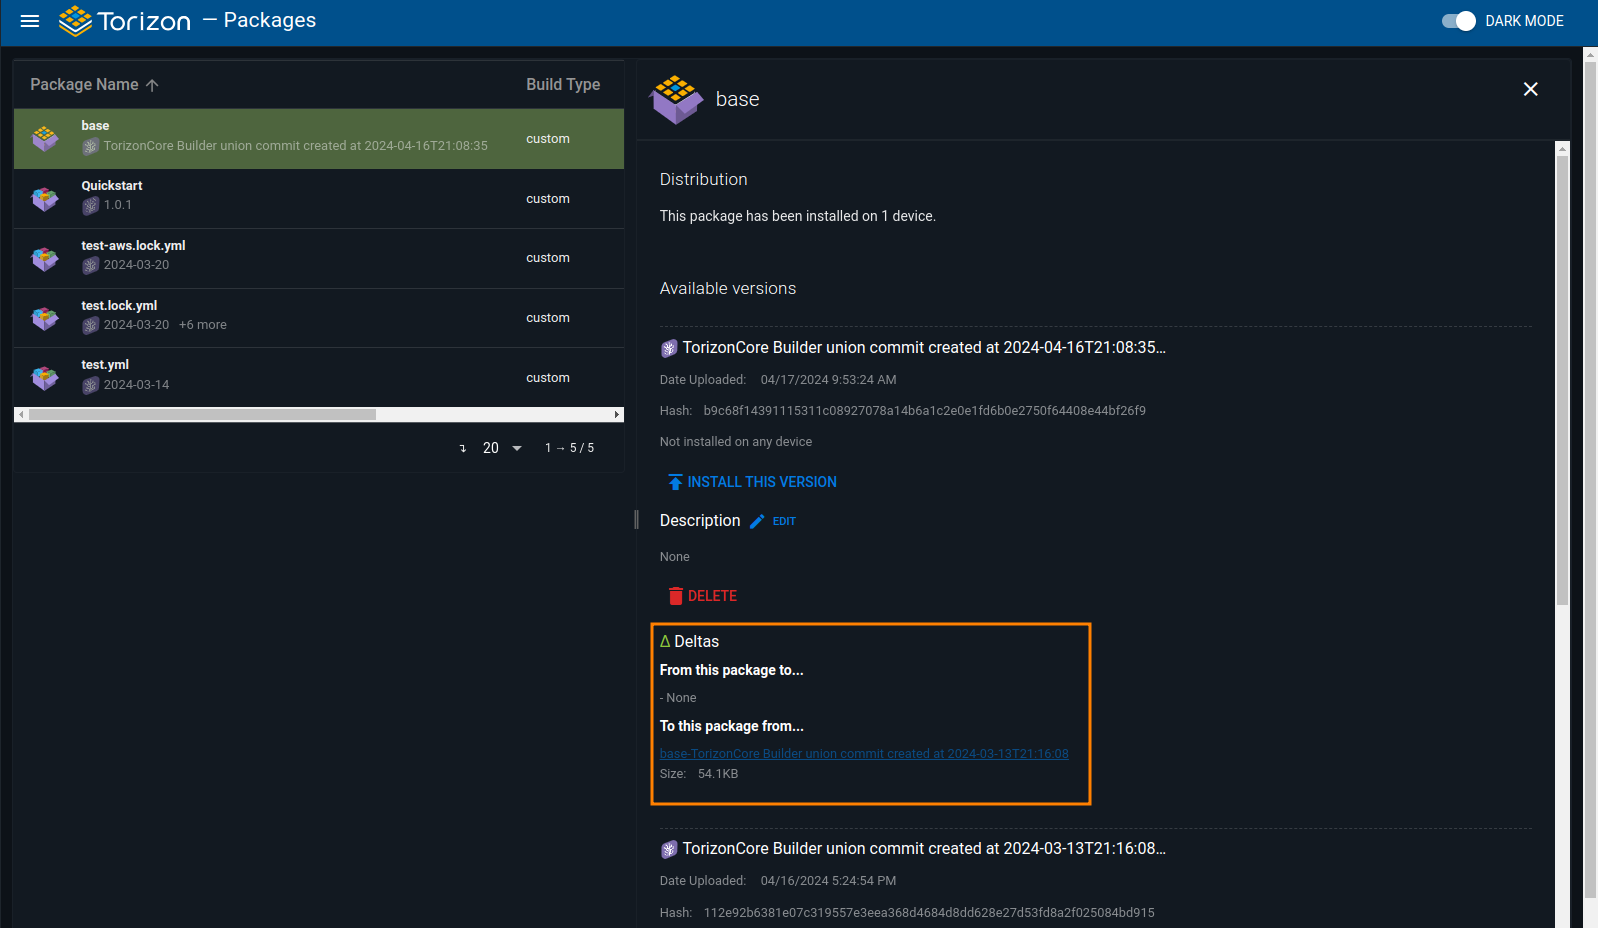
From the torizon platform, click in the package you created the static-delta. You can see the push worked from this new field, "Deltas"